Tutorial
Disclaimer
Warning
This document serves as a single page tutorial for mlf-core, the issue of deterministic machine learning and everything related. It is not supposed to be used as a reference documentation for specific pieces of information. Please use the remaining mlf-core or the respective tools’ documentation for this purpose. Although, mlf-core is designed with users in mind and as easy as possible it is inherently complex due to the nature of the issue it solves. Hence, please be patient while working through this tutorial.
Introduction
The fields of machine learning and artificial intelligence grew immensly in recent years. Nevertheless, many papers cannot be reproduced and it is difficult for scientists even after rigorous peer review to know which results to trust. This serious problem is known as the reproducibility crisis in machine learning. The reasons for this issue are manifold, but include the fact that major machine learning libraries default to the usage of non-deterministic algorithms based on atomic operations. Solely fixing all random seeds is not sufficient for deterministic machine learning. Fortunately, major machine learning libraries such as Pytorch, Tensoflow and XGBoost are aware of these issues and the they are slowly providing more and more deterministic variants of these atomic operations based algorithms. We evaluated the current state of deterministic machine learning and formulated a set of requirements for fully reproducible machine learning even with several GPUs. Based on this evaluation we developed the mlf-core ecosystem, an intuitive software solution solving the issue of irreproducible machine learning.
mlf-core Overview
The mlf-core ecosystem consists of the primary Python packages mlf-core and system-intelligence, a set of GPU enable docker containers <https://github.com/mlf-core/containers> and various fully reproducible machine learning projects found in the mlf-core Github organization.
An overview of the mlf-core ecosystem.
This tutorial will primarily focus on the mlf-core Python package since it is the part that users will knowingly use the most. Additionally, mlf-core makes heavy use of Conda, Docker, Github and Github Actions. To follow the tutorial you should also have Conda, Docker and nvidia-docker installed and tested. Please follow the respective installation instructions found on the tools’ websites. We strongly suggest that you look for tutorials on Youtube or your favorite search engine to get comfortable with these technologies before proceeding further. Whenever we use more advanced features of these tools we will explain them. Therefore you don’t need to be an expert, but a good overview is helpful.
Installation
The mlf-core Python package is available on PyPI and the latest version can be installed with
$ pip install mlf-core
It is advised to use a virtual environment for mlf-core since it relies on explicitly pinning many requirements. To verify that your installation was successful run:
$ mlf-core --help
Configuration
mlf-core tightly (optionally, but strongly recommended) integrates with Github and wants to prevent overhead when creating several projects. Therefore mlf-core requires a little bit of configuration before the first usage. To configure mlf-core run:
$ mlf-core config all
Enter your full name, your email and your Github username (hit enter if not available). Next you will be asked whether you want to update your Github personal access token. mlf-core requires your Github access token to automatically create a Github repository to upload your code and to enable mlf-core’s sync functionality (explained later). Hence, answer with y. Now you will be prompted for the token. To create a token go to Github and log in. Next, click on your profile avater and navigate to ‘Settings’.
Click on ‘Settings’.
Now navigate to the ‘Developer settings’.

Click on ‘Developer settings’ in the bottom left. Then access ‘Personal access token’ and click ‘Generate new token in the top right. You should now be prompted for your password. Enter a name for the note that clearly specifies what it is for e.g. ‘mlf-core token’. Tick all options in the following image:
Select all of the in the screenshot ticked options. No additional options are required, especially not repository deletion.
Click ‘Generate token’ at the very bottom and copy your token into the prompt of mlf-core. Hit enter and accept the update. mlf-core is now configured and ready to be used!
For more details including security precautions please visit Configure mlf-core and Github Support.
Creating a mlf-core project
mlf-core offers templates for several machine learning libraries. To get an overview of all available machine learning templates run:
$ mlf-core list
If you want a more detailed overview you can also run:
$ mlf-core info <template-handle/type/library>
A more detailed overview on all available templates is provided here.
In the follow sections we will create and focus on a Pytorch based template identified under the template handle mlflow-pytorch.
The outlined processes work the same for all other templates.
To create a mlf-core project run:
$ mlf-core create
mlflow and pytorch afterwards. Enter a project name, a project description, hit enter for the version prompt and selected a license of your choosing.
MIT and the Apache 2.0 license are common choices. Next, hit the y button when asked whether you want to create a Github repository and push your code to it.
If you select n as in no and create a Github repository manually, mlf-core will not be able to set up required secrets for features such as Docker container building and mlf-core sync.y or n.
The project creation process will now end with mlf-core lint verifying the successful creation if your project and the link to your Github repository being printed.
The project creation process with mlf-core
mlf-core project overview
Using tree we identify the following file structure:
├── .bandit.yml <- Configuration file for Bandit (identifies security issues in the code)
├── CHANGELOG.rst <- Changelog of the project (controlled by mlf-core bump-version)
├── CODE_OF_CONDUCT.rst
├── Dockerfile <- Dockerfile specifying how the Docker container is build; Uses the environment.yml file to create a Conda environment inside the container
├── docs
│   ├── authors.rst
│   ├── changelog.rst
│   ├── code_of_conduct.rst
│   ├── conf.py <- Sphinx configuration file
│   ├── index.rst <- Root of the documentation; defines the toctree
│   ├── make.bat <- Windows version of the Makefile
│   ├── Makefile <- Makefile for the documentation (run   make html   to build the documentation)
│   ├── model.rst <- Model documentation
│   ├── readme.rst
│   ├── requirements.txt <- Defines Python dependencies for the documentation
│   ├── _static
│   │   └── custom_cookietemple.css <- Custom dark documentation style
│   └── usage.rst <- How to use the mlf-core model
├── .editorconfig <- Configuration for IDEs and editors
├── environment.yml <- Defines all dependencies for your project; Used to create a Conda environment inside the Docker container
├── project_name
│   ├── data_loading
│   │   ├── data_loader.py <- Loading and preprocess training/testing data
│   ├── mlf_core
│   │   └── mlf_core.py <- mlf-core internal code to run system-intelligence and advanced logging; Should usually not be modified
│   ├── model
│   │   ├── model.py <- Model architecture
│   ├── project_name.py <- Entry point for MLflow; Connects all pieces
├── .flake8 <- flake8 configuration file (lints code style)
├── .gitattributes <- git configuration file
├── .github
│   ├── ISSUE_TEMPLATE
│   │   ├── bug_report.md
│   │   ├── feature_request.md
│   │   └── general_question.md
│   ├── pull_request_template.md
│   └── workflows
│       ├── lint.yml <- Runs mlf-core lint and flake8 on push events
│       ├── master_branch_protection.yml <- Protects the master branch from non-release merges
│       ├── publish_docker.yml <- Publishes the Docker container on Github Packages (or alternatives)
│       ├── publish_docs.yml <- Publishes the documentation on Github Pages or Read the Docs
│       ├── sync.yml <- Checks for new mlf-core templates versions and triggers a PR with changes if found; Runs daily
│       └── train_cpu.yml <- Trains the model with a reduced dataset on the CPU
├── .gitignore
├── LICENSE
├── mlf_core.cfg <- mlf-core configuration file (sync, bump-version, linting, ...)
├── .mlf_core.yml <- Meta information of the mlf_core.yml file; Do not edit!
├── MLproject <- MLflow Project file; Defines entry point and parameters
├── README.rst
└── .readthedocs.yml <- Read the Docs configuration file
Now would be a good time to explore the specific files to understand how everything is connected. Do not worry if there appear to be an overwhelming amount of files. With just a little bit of experience you will easily understand which files you should edit and which ones can be safely ignored. We will now examine a couple of files more closely. Note that for visual reasons a couple of lines are removed in this tutorial.
CI & CD with Github Actions
All mlf-core based projects use Github Actions for continous integration (CI) and continous development (CD). As soon as your project is on Github all Github Actions are enabled automatically. The purpose of these workflows will be explained throughout this tutorial.
MLProject
The MLproject file is the primary configuration file for MLflow. It defines with which runtime environment the project is run, configures them and configures MLflow entry points.
name: project_name

# conda_env: environment.yml
docker_env:
    image: ghcr.io/github_user/project_name:0.1.0-SNAPSHOT
    volumes: ["${PWD}/data:/data"]
    environment: [["MLF_CORE_DOCKER_RUN", "TRUE"],["CUBLAS_WORKSPACE_CONFIG", ":4096:8"]]

entry_points:
main:
    parameters:
    max_epochs: {type: int, default: 5}
    gpus: {type: int, default: 0}
    accelerator: {type str, default: "None"}
    lr: {type: float, default: 0.01}
    general-seed: {type: int, default: 0}
    pytorch-seed: {type: int, default: 0}
    command: |
        python project_name/project_name.py \
            --max_epochs {max_epochs} \
            --gpus {gpus} \
            --accelerator {accelerator} \
            --lr {lr} \
            --general-seed {general-seed} \
            --pytorch-seed {pytorch-seed}
mlf-core projects by default run with Docker. If you prefer to run your project with Conda you need to comment in conda_env and comment out
docker_env and its associated configuration. We are currently working on easing this switching, but for now it is a MLflow limitation.
The image by default points to the Docker image build on Github Packages which automatically happens on project creation.
Moreover, all runs mount the data directory in the root folder of the project to /data inside the container.
Therefore, you need to ensure that your data either resides in the data folder of your project or adapt the mounted volumes to include your training data.
mlf-core also presets environment variables required for deterministic machine learning. Do not modify them without an exceptional reason.
Finally, the project_name.py file is set as an entry point and all parameters are defined and passed with MLflow.
Dockerfile
The Dockerfile usually does not need to be adapted. It is based on a custom mlf-core base container which provides CUDA, Conda and other utilities.
FROM mlfcore/base:1.2.0

# Install the conda environment
COPY environment.yml .
RUN conda env create -f environment.yml && conda clean -a

# Activate the environment
RUN echo "source activate exploding_springfield" >> ~/.bashrc
ENV PATH /home/user/miniconda/envs/exploding_springfield/bin:$PATH

# Dump the details of the installed packages to a file for posterity
RUN conda env export --name exploding_springfield > exploding_springfield_environment.yml
The Docker container simply uses the environment.yml file to create a Conda environment and activates it. You can find the base container definitions in the mlf-core containers repository.
environment.yml
The environment.yml file is used for both, running the mlf-core project with Conda, and for creating the Conda environment inside the Docker container.
Therefore you only need to specify your dependencies once in this file.
Try to always define all dependencies from Conda channels if possible and only add PyPI dependencies if a Conda version is not available.
However, note that only the version combinations of the template were tested to be deterministic and to create valid environments.
We encourage you to regularly upgrade your dependencies, but do so at your own risk!
name: project_name
channels:
- defaults
- conda-forge
- pytorch
dependencies:
- defaults::cudatoolkit=11.0.221
- defaults::python=3.8.2
- conda-forge::tensorboardx=2.1
- conda-forge::mlflow=1.13.1
- conda-forge::rich=9.10.0
- pytorch::pytorch=1.7.1
- pytorch::torchvision=0.8.2
- pytorch-lightning==1.1.8
- pip
- pip:
    - pycuda==2019.1.2  # not on Conda
    - cloudpickle==1.6.0
    - boto3==1.17.7
    - system-intelligence==2.0.2
If you have dependencies that are not available on Conda nor PyPI you can adapt the Docker container.
Post project creation TODOs
mlf-core tries to automate as much as possible, but some minor actions need to be done manually.
Public Docker container on Github Packages
mlf-core by default pushes the Docker container using the publish_docker.yml Github Actions workflow to Github Packages.
If you want to push your Docker container to a different registry you need to adapt the workflow and potentially update the username and add a Github secret for your password.
By default, containers pushed to Github are private. As a result you would need to log in to pull the container.
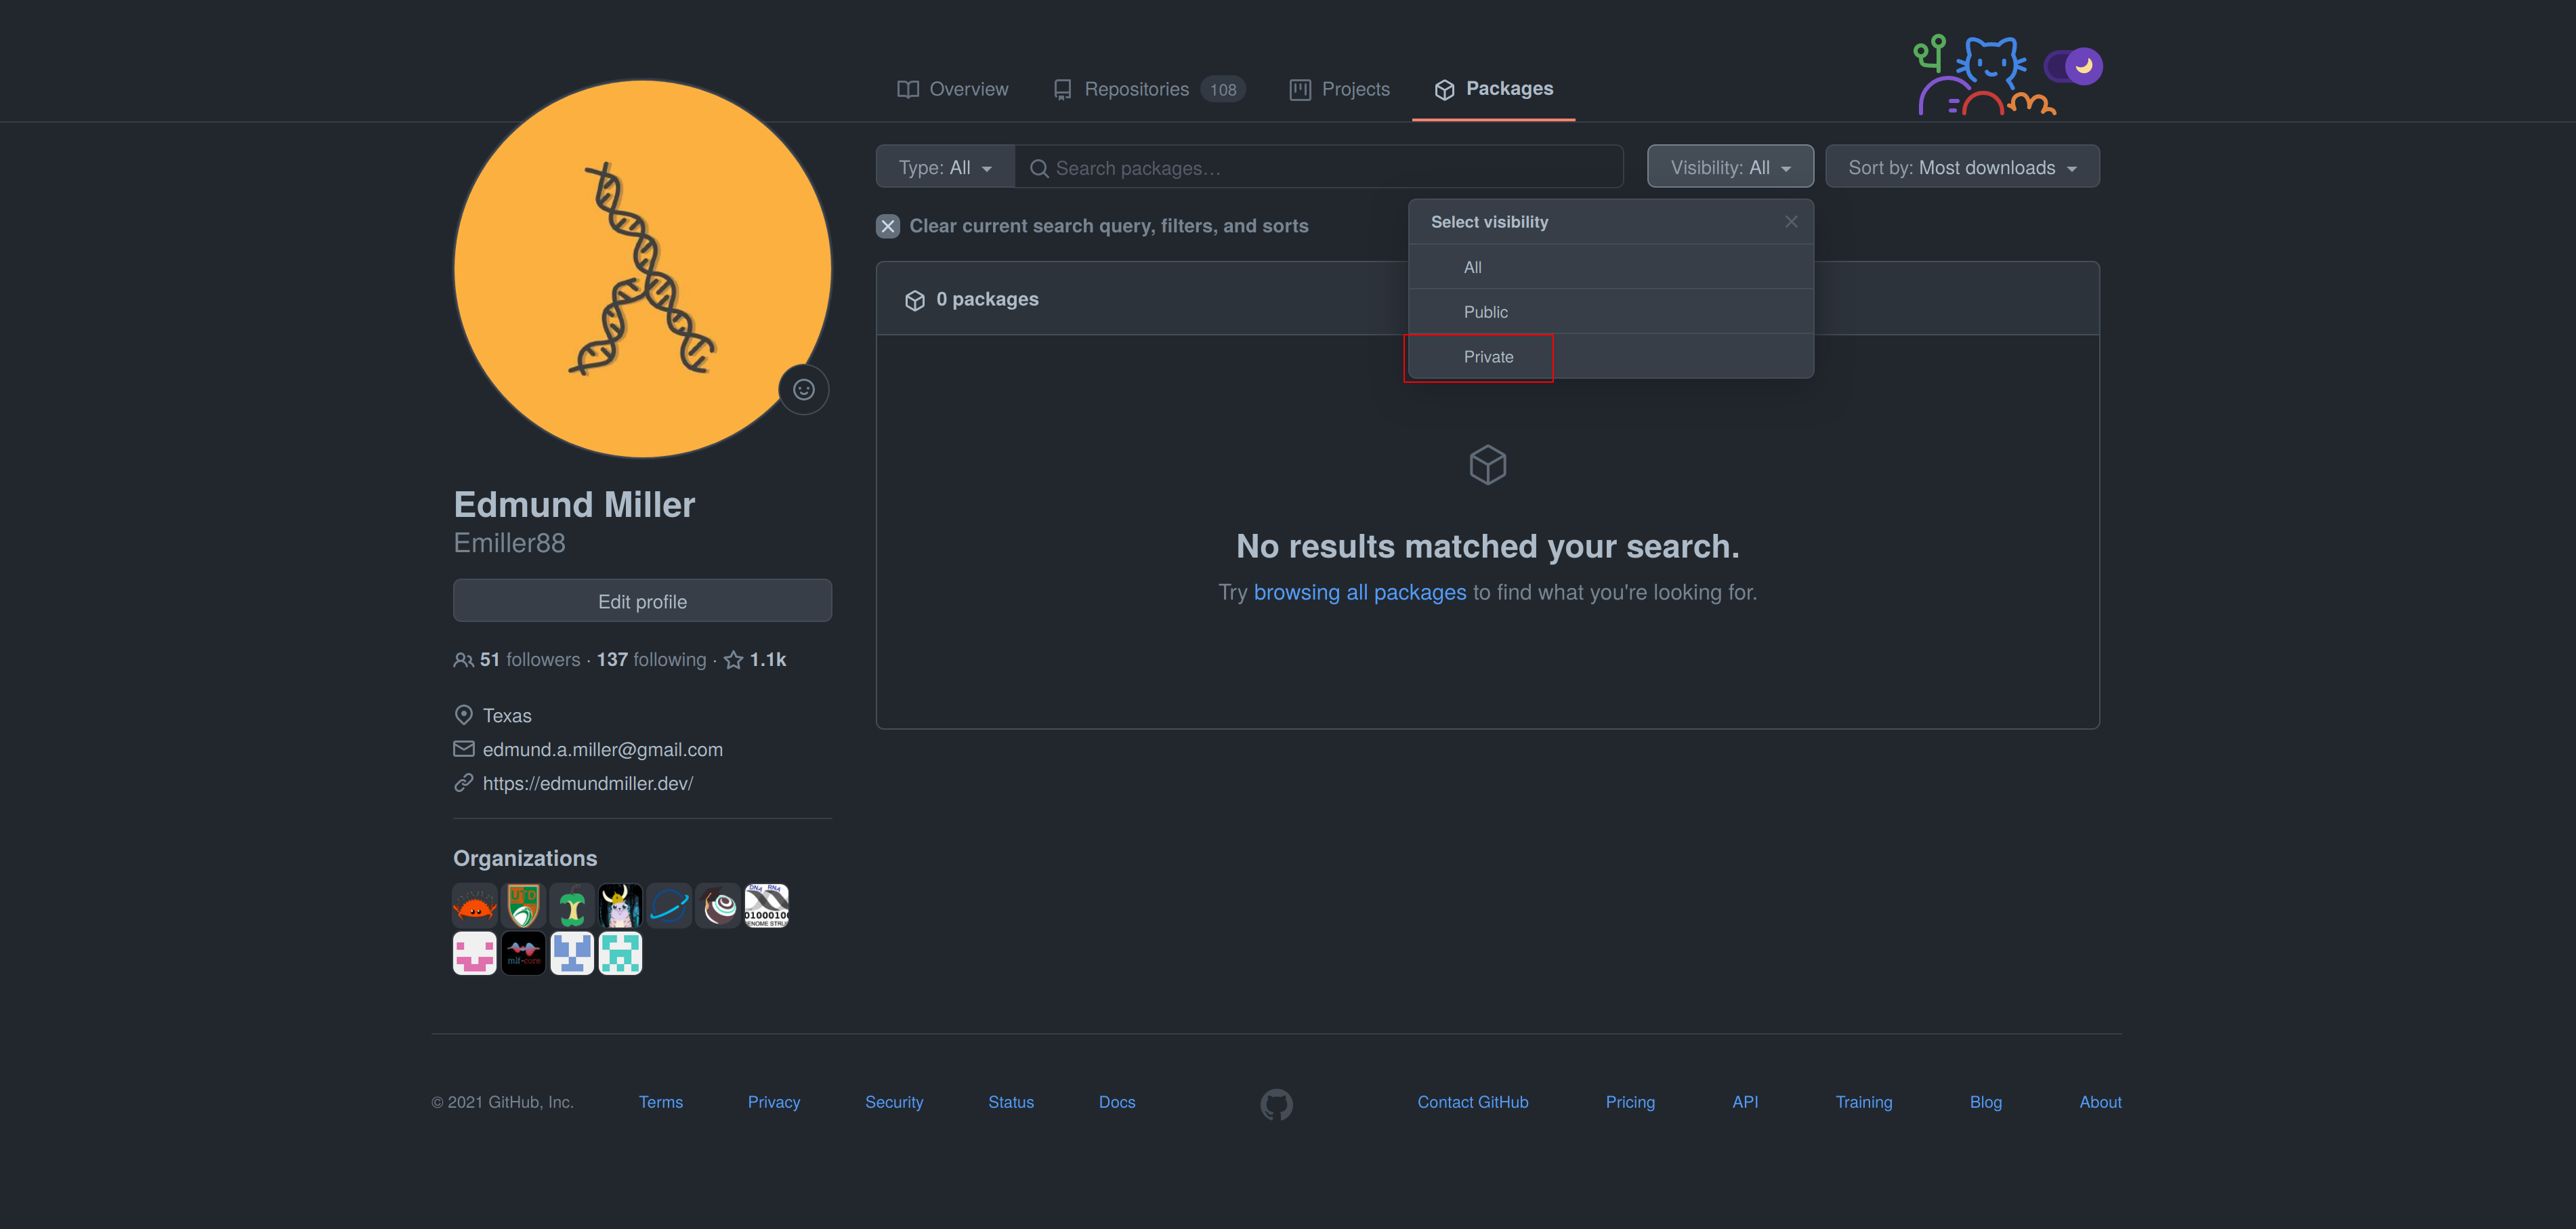
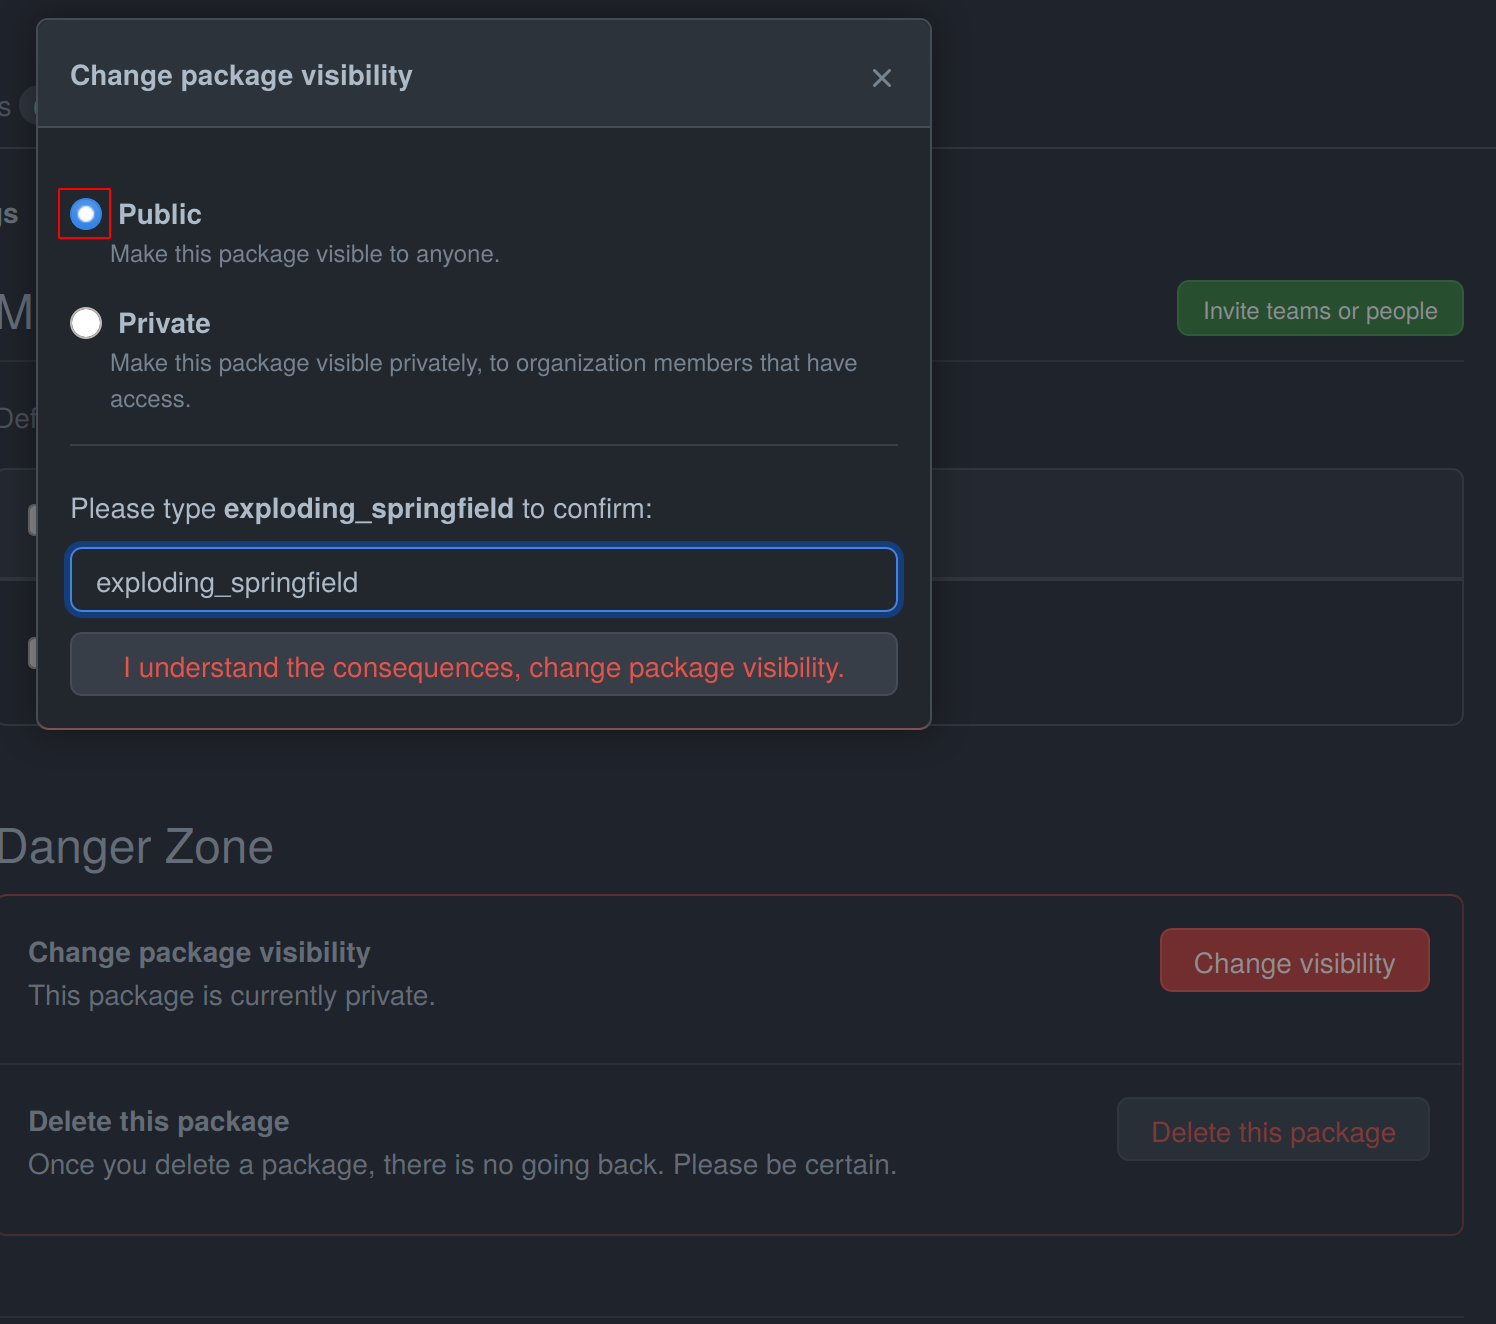
Hence, you have to make your Docker container public by navigating to the used Github account, selecting Packages and then your package.
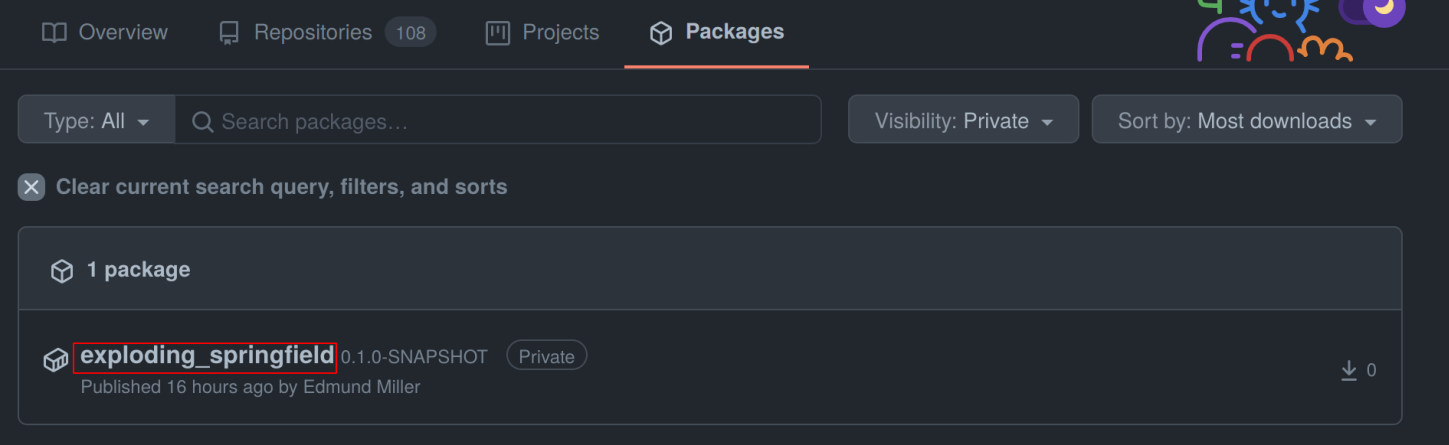
As of writing this, there is a bug with the GitHub UI, that doesn’t show private images without selecting the visibility. Click visibility, and then private, and select your docker image.
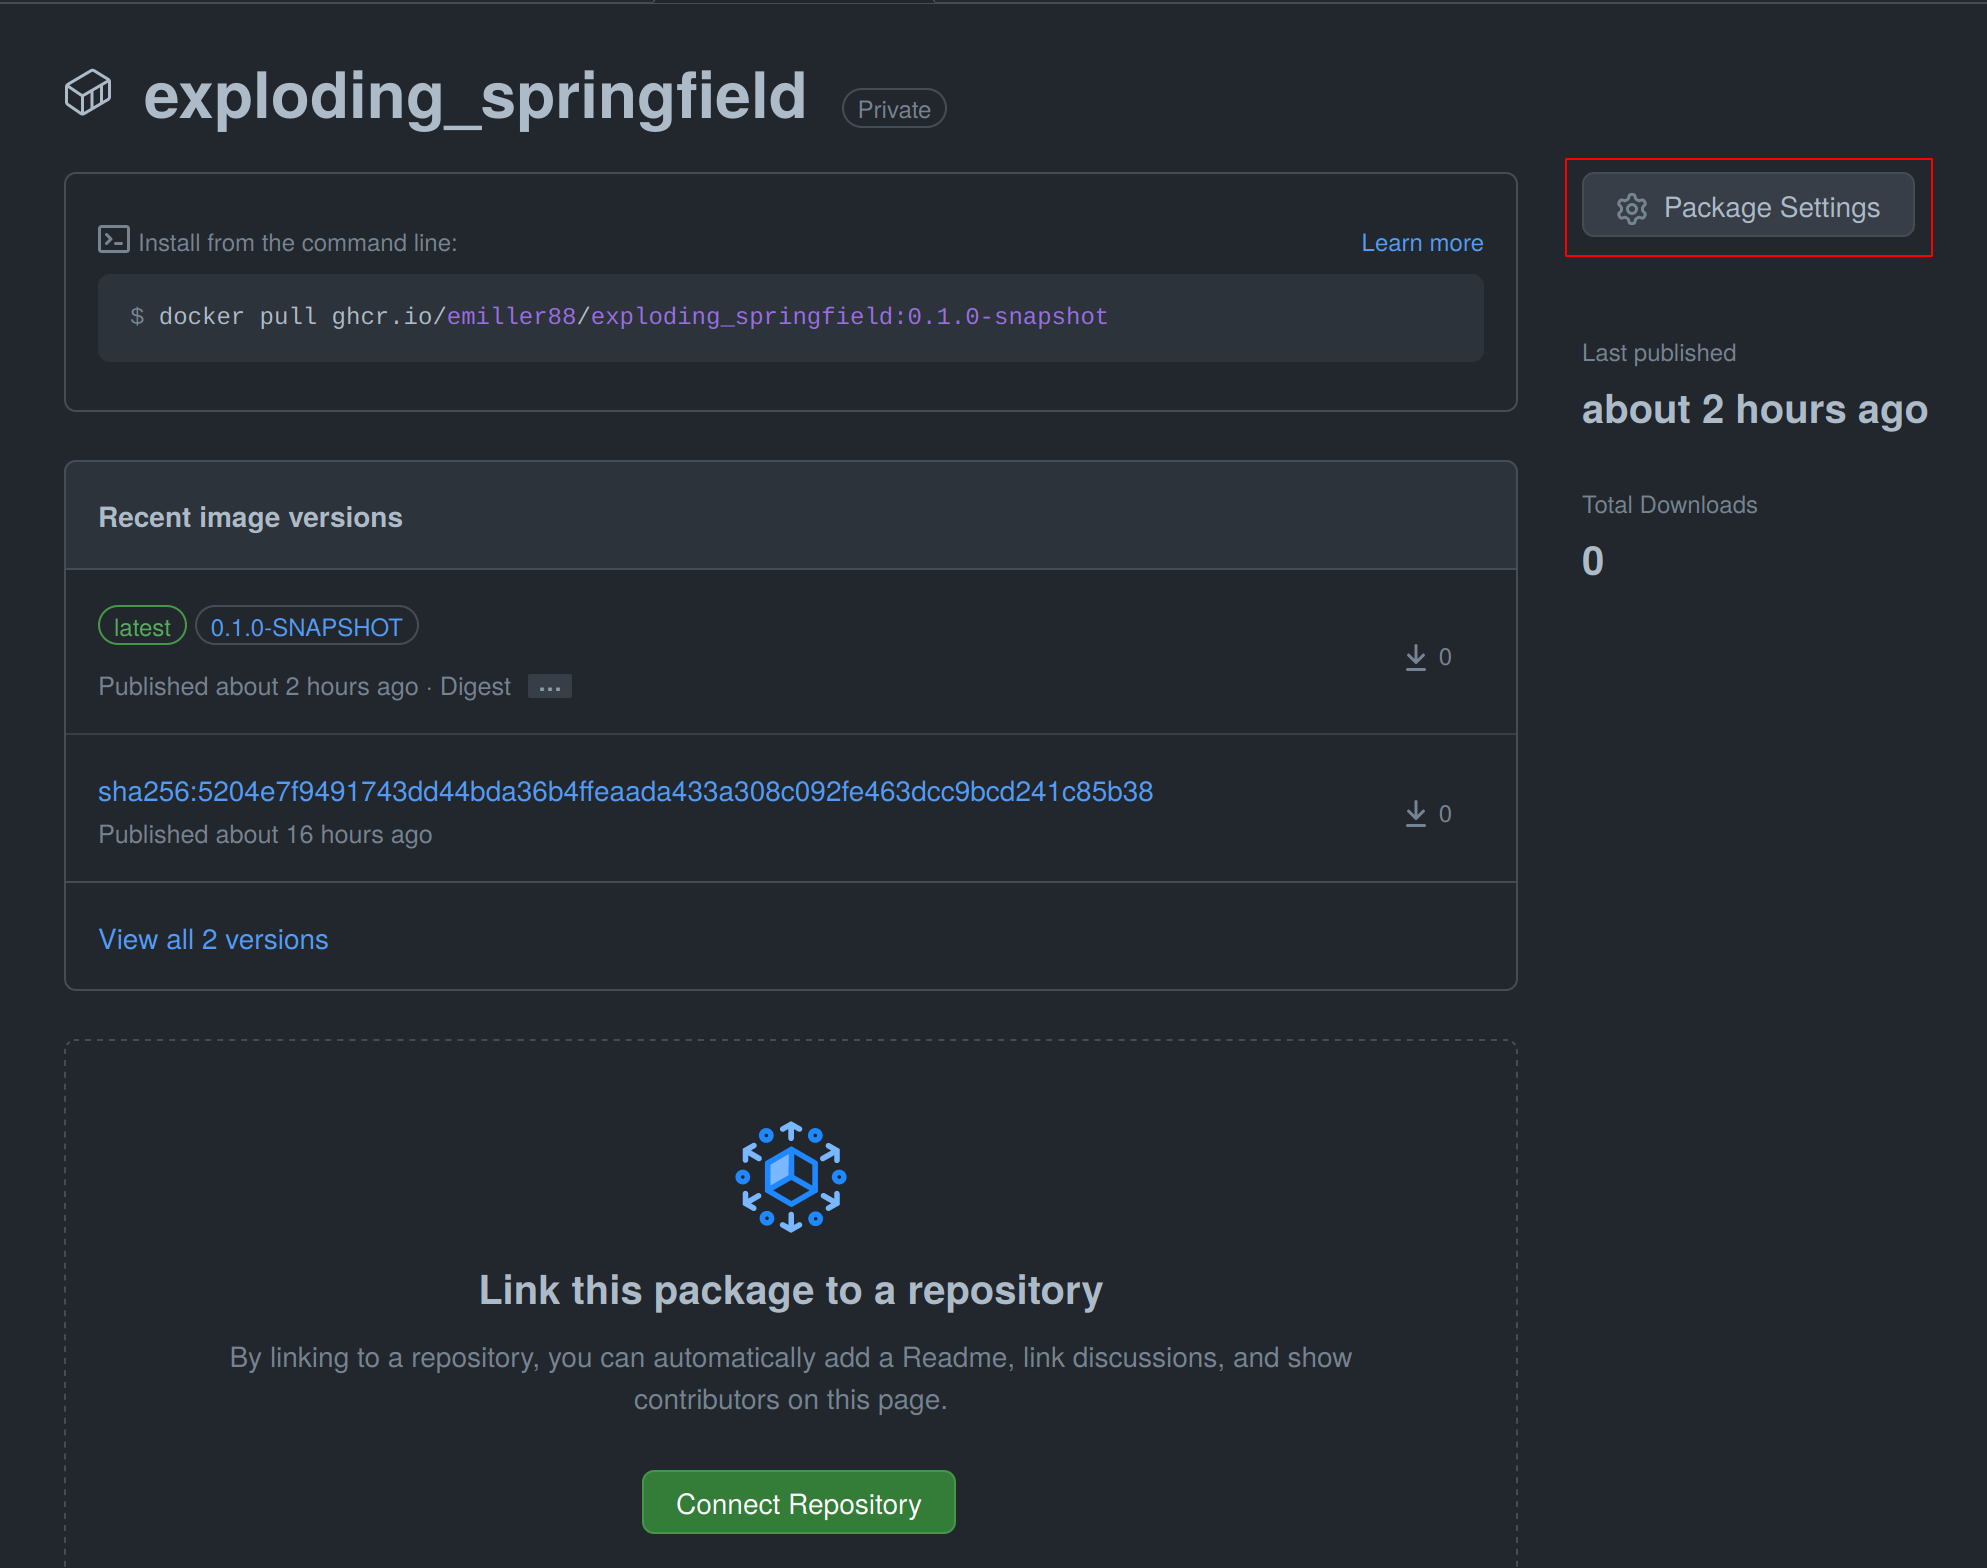
On the right you will find a button package settings.
Scroll down on the package settings page and at the bottom you will find a button Change visibility.
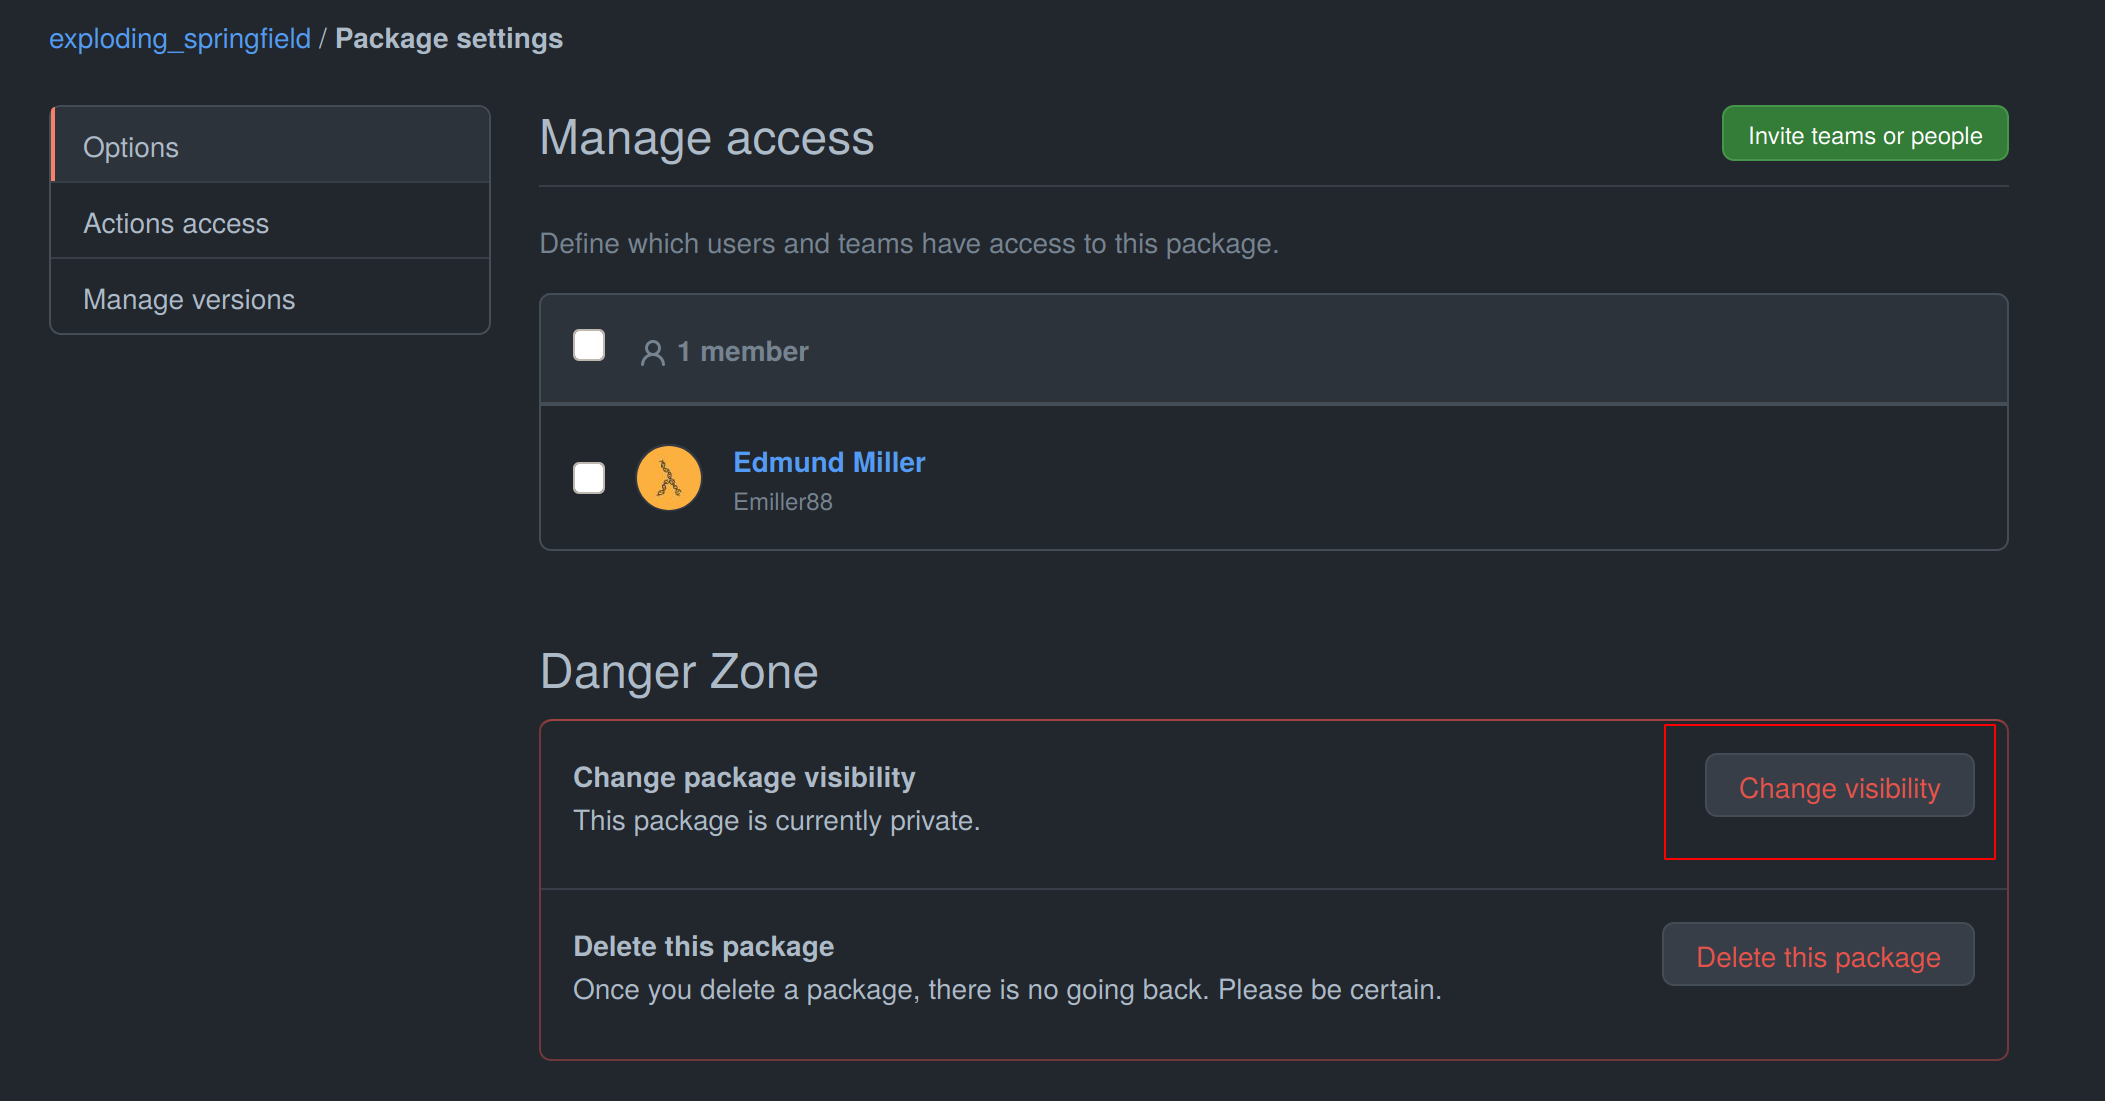
Select Public, type in your project name, click it, authenticate and your Github container is now public!
Be aware of the fact that building the Docker container usually takes 15-20 minutes and therefore your Docker container will not immediately show up in the Packages tab.
Publish documentation on Github Pages or Read the Docs
mlf-core projects offers a Sphinx based documentation setup which can easily be hosted on either Github Pages or Read the Docs. The choice is yours. Note that you may need to update the badge in the README of your project.
Github Pages
The publish_docs.yml Github action pushes your built documentation automatically to a branch called gh-pages.
Hence, you only need to enable Github Pages on this branch.
Please follow the final steps (6-8 at time of writing) of the official Github - creating your site documentation.
Read the Docs
Please follow the offical Read the Docs - Building your documentation documentation.
Training models with mlf-core
mlf-core models are designed to easily run on any hardware with the same runtime environment.
First, select the runtime environment by commenting either Conda or Docker in or out as described above.
Depending on the used template the commands for training a model on the CPU, a GPU or multiple GPUs may slightly differ.
In all cases they are described in the usage.rst file.
Remember that MLflow parameters are passed as -P key=val and Docker parameters as -A key=val or -A key.
For our just created mlflow-pytorch project, assuming that we are in the root directory of the project, we run our project as follows:
CPU
$ mlflow run . -A t
Single GPU
$ mlflow run . -A t-A gpus=all -P gpus=1
Multiple GPUs
$ mlflow run . -A t-A gpus=all -P gpus=2 -P acc=ddp
This will train our model on 2 gpus with the distributed data parallel accelerator.
Adjust the number of GPUs to your liking.
Interactive visualization
Congratulations, you have just trained your first GPU deterministic model! All metrics and models are saved in the mlruns directory.
A couple of metrics were already printed onto the terminal. However, due to the tight MLflow integration there are more ways to visualize our results.
mlflow UI
To open the mlflow UI simply run mlflow ui in the root directory of your project.
Note that if you trained on a different machine than you now want to open the MLflow web interface, you should run mlf-core fix-artifact-paths on the local machine.
This will ensure that all artifacts are visible. Open the URL shown in the terminal in your browser.
You should be greeted with something like this:
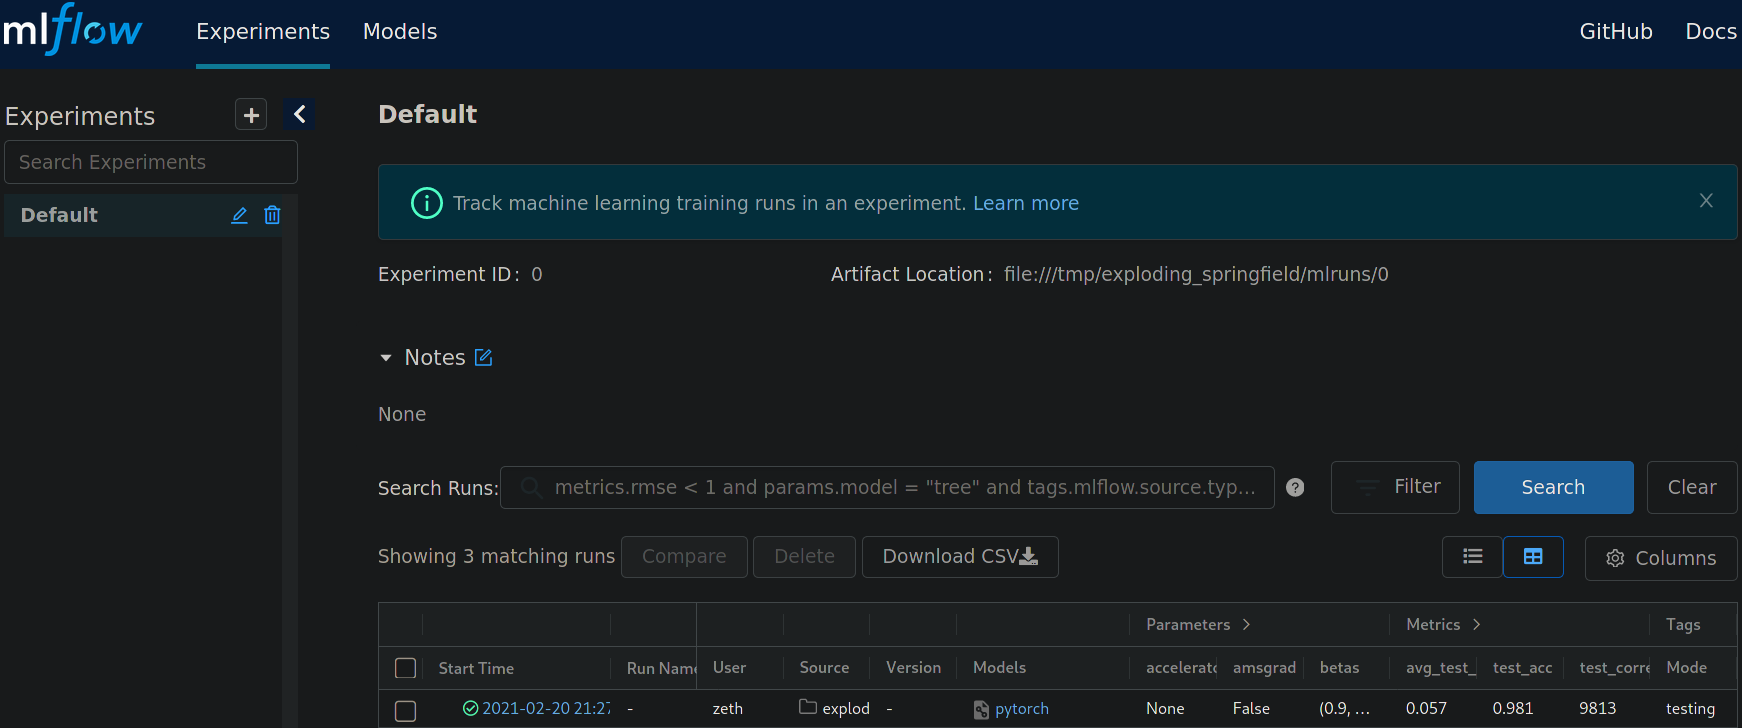
Landing page of the MLflow web interface.
All runs are grouped into experiments together with a run status. Simply click on a specific run to see more details:
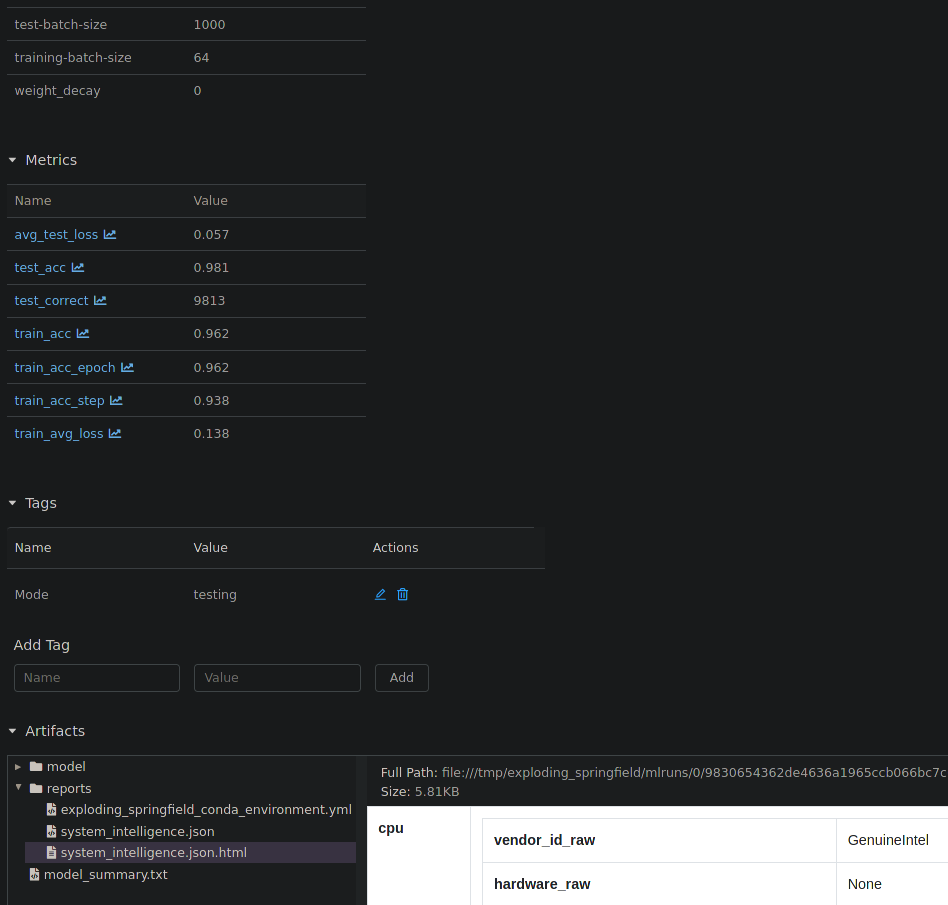
Detailed overview of a MLflow run.
When clicking on one of the metrics you can also view for example a line plot of the performance over time or per epoch.
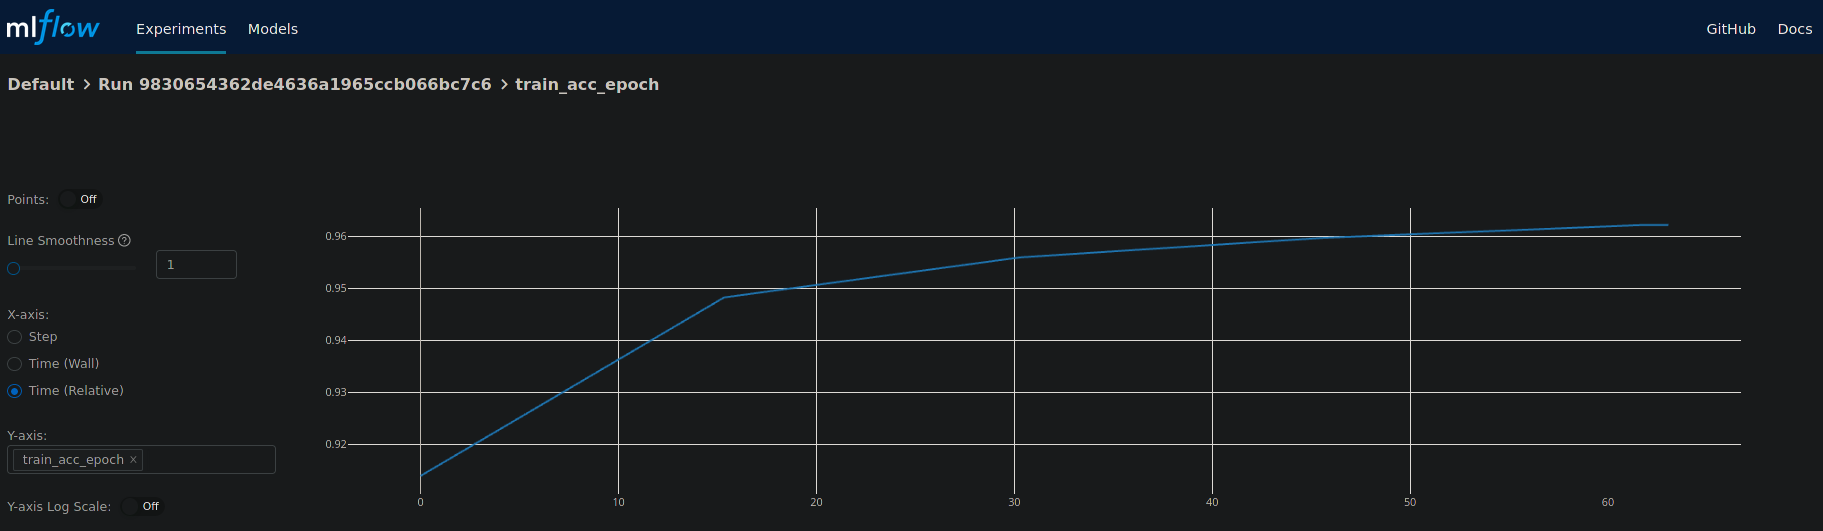
Plot of the training epochs of a run.
The MLflow web interface can also be hosted somewhere and be made accessible to other collaborators. Consult the MLflow documentation for this purpose.
Tensorboard
At the end of the run the project will print out a command to view your just trained model with Tensorboard. Simply run the command and open the URL in your favorite browser.
Serving a mlf-core model
A benefit of MLflow is that it allows you to easily serve your model to make it available to other users:
$ mlflow models serve -m <path to the model>
will spin up a server to which you can send requests to and will receive predictions as answers! Please follow the MLflow deployment documentation.
Developing mlf-core projects
mlf-core offers additional functionality that eases development. A subset of these features and general development tips are the focus of this section.
git branches and development flow
As soon as your project is pushed to Github you will see that four branches are used:
A
master/mainbranch. This branch should at any point only contain the latest release.A
developmentbranch. Use this branch to collect all development milestones.A
TEMPLATEbranch. This branch is used for syncing (see below). Do not touch it.A
gh-pagesbranch. The built documentation is pushed to this branch. You should not have to edit it manually.
While developing always merge first into the development branch.
If you think that your code is ready to become a new release create a release branch such as: release-1.0.0.
Now open a pull request from the release branch into the master branch and have any collaborators review it.
When ready merge it into the master branch and create a new Github release. This will trigger a release build of your Docker container.
Rebuilding the Docker container
Whenever you add new libraries to the environment.yml file simply push to the development branch.
Your Docker container will rebuild and overwrite the latest development container.
Increasing the project version with mlf-core bump-version
Increasing the version of a project across several files is cumbersome.
Hence, mlf-core offers a mlf-core bump-version command.
Considering that a usual project starts as a 0.1.0-SNAPSHOT version (SNAPSHOT equals unstable development version) you should,
following the development flow introduced above, increase the version on the release branch:
$ mlf-core bump-version 0.1.0 .
This will update the version of all files and add a new section in the changelog which you should continously keep up to date. For more details please visit Bumping the version of an existing project.
Ensuring determinism with mlf-core lint
Determinism is the heart and soul of mlf-core projects. Ideally you, as a user of mlf-core, do not need to know how mlf-core ensures determinism behind the scenes. The only thing that you have to do is to periodically run:
$ mlf-core lint
on your project. You will be made aware of any violations of known non-determinism and how to fix them. This ensures that you can fix the issues by yourself and learn in the process without requiring expert knowledge beforehand.

Example of a mlf-core lint run. The usage of the function bincount was found, which is known to operate non-deterministically. It has to be replaced.
mlf-core lint is also run on any push event to any branch on your Github repository.
For more details please read Linting your project.
Utilizing the MLFCore singleton class
When you start to build your model you will notice several MLFCore function calls already built in.
These calls set all required random seeds and log the hardware together with the runtime environment.
Moreover, the MLFCore singleton allows for data tracking with MD5 sums.
These functions can be found in mlf_core/mlf_core.py if you want to peak under the hood.
Usually they should neither be modified nor removed without any strong reason.
It’s also maintained by the linter in-case anything gets changed on accident.
To log your input data use:
from mlf_core.mlf_core import MLFCore

MLFCore.log_input_data('data/')
Keeping mlf-core based projects up to data with mlf-core sync
mlf-core continously tries to update all project templates to adhere to the latest best practices and requirements for deterministic machine learning. Whenever mlf-core releases a new version and updated templates you will automatically receive a pull request with the latest changes. You should then try to integrate them as fast as possible and to create a minor release.
For more details and configuration options please visit Syncing your project.
Contributing to mlf-core
There are various ways of contributing to mlf-core. First you can make your best practice model available by forking your project to the mlf-core organization or by developing it there directly. Be aware that we would like to discuss this first with you to ensure that only well developed or finished projects are in the mlf-core organization. This increases the visibility of your project and is a seal of quality. Moreover, you can join the Community Discord via this link. We are looking forward to meeting you and are always available to help if required!