Welcome to mlf-core’s documentation!

mlf-core


![]()
![]()
![]()
![]()

Preprint
Overview
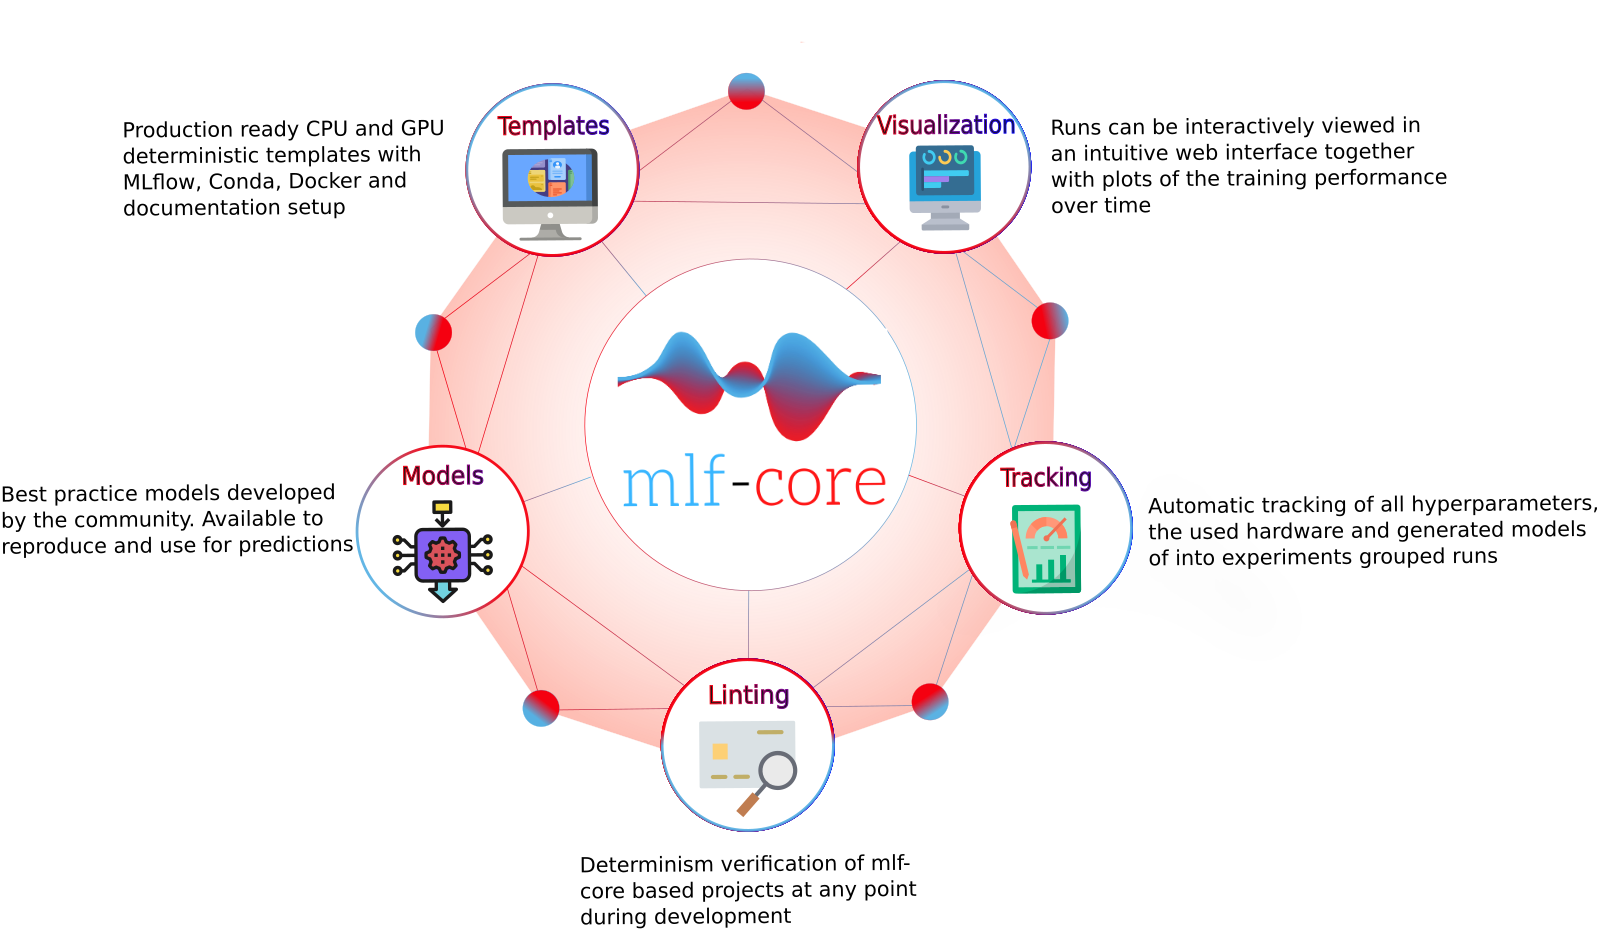
mlf-core provides CPU and GPU deterministic machine learning templates based on MLflow, Conda, Docker and a strong Github integration. Templates are available for PyTorch, TensorFlow and XGBoost. A custom linter ensures that projects stay deterministic in all phases of development and deployment.
Installing
Start your journey with mlf-core by installing it via $ pip install mlf-core.
See Installation.
run
See a mlf-core project in action.

config
Configure mlf-core to get started.

list
List all available mlf-core templates.

info
Get detailed information on a mlf-core template.

create
Kickstart your deterministic machine laerning project with one of mlf-core’s templates in no time.
See Create a project.
lint
Use advanced linting to ensure your project always adheres to mlf-core’s standards and stays deterministic.

bump-version
Bump your project version across several files.

sync
Sync your project with the latest mlf-core release to get the latest template features.
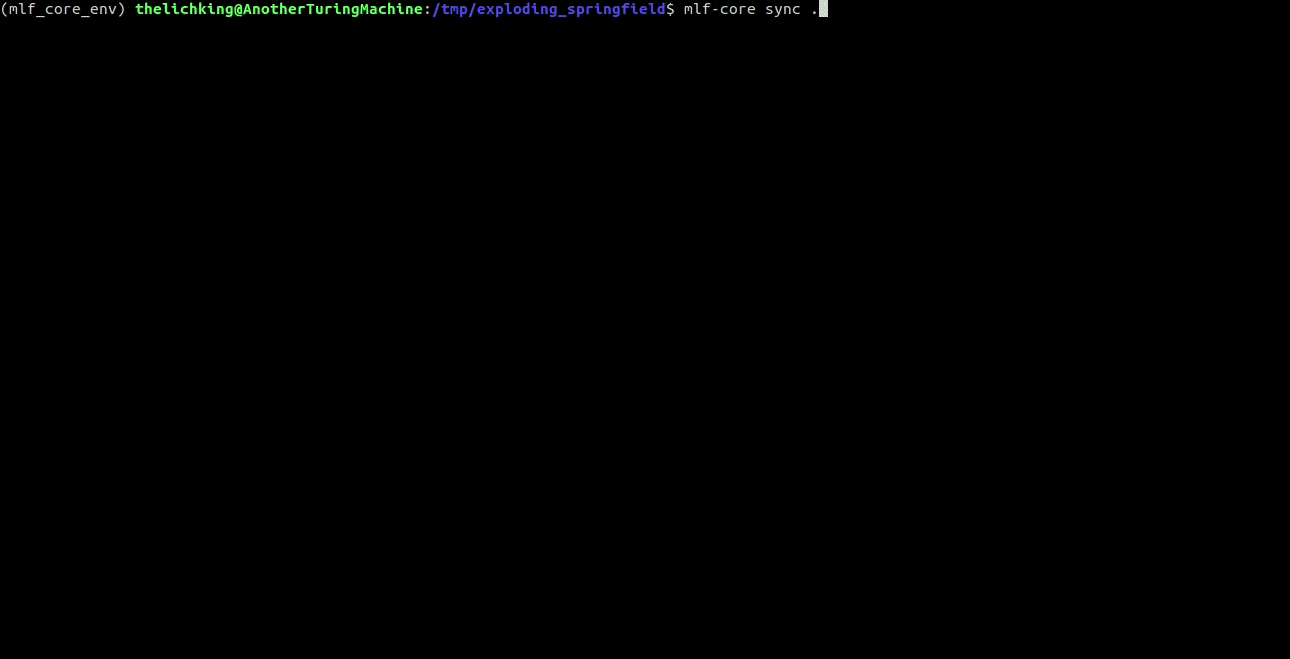
See Syncing a project.
upgrade
Check whether you are using the latest mlf-core version and update automatically to benefit from the latest features.
Credits
Primary idea and main development by Lukas Heumos. mlf-core is inspired by nf-core. This package was created with cookietemple based on a modified audreyr/cookiecutter-pypackage project template using cookiecutter.
Tutorial
Disclaimer
Warning
This document serves as a single page tutorial for mlf-core, the issue of deterministic machine learning and everything related. It is not supposed to be used as a reference documentation for specific pieces of information. Please use the remaining mlf-core or the respective tools’ documentation for this purpose. Although, mlf-core is designed with users in mind and as easy as possible it is inherently complex due to the nature of the issue it solves. Hence, please be patient while working through this tutorial.
Introduction
The fields of machine learning and artificial intelligence grew immensly in recent years. Nevertheless, many papers cannot be reproduced and it is difficult for scientists even after rigorous peer review to know which results to trust. This serious problem is known as the reproducibility crisis in machine learning. The reasons for this issue are manifold, but include the fact that major machine learning libraries default to the usage of non-deterministic algorithms based on atomic operations. Solely fixing all random seeds is not sufficient for deterministic machine learning. Fortunately, major machine learning libraries such as Pytorch, Tensoflow and XGBoost are aware of these issues and the they are slowly providing more and more deterministic variants of these atomic operations based algorithms. We evaluated the current state of deterministic machine learning and formulated a set of requirements for fully reproducible machine learning even with several GPUs. Based on this evaluation we developed the mlf-core ecosystem, an intuitive software solution solving the issue of irreproducible machine learning.
mlf-core Overview
The mlf-core ecosystem consists of the primary Python packages mlf-core and system-intelligence, a set of GPU enable docker containers <https://github.com/mlf-core/containers> and various fully reproducible machine learning projects found in the mlf-core Github organization.

An overview of the mlf-core ecosystem.
This tutorial will primarily focus on the mlf-core Python package since it is the part that users will knowingly use the most. Additionally, mlf-core makes heavy use of Conda, Docker, Github and Github Actions. To follow the tutorial you should also have Conda, Docker and nvidia-docker installed and tested. Please follow the respective installation instructions found on the tools’ websites. We strongly suggest that you look for tutorials on Youtube or your favorite search engine to get comfortable with these technologies before proceeding further. Whenever we use more advanced features of these tools we will explain them. Therefore you don’t need to be an expert, but a good overview is helpful.
Installation
The mlf-core Python package is available on PyPI and the latest version can be installed with
$ pip install mlf-core
It is advised to use a virtual environment for mlf-core since it relies on explicitly pinning many requirements. To verify that your installation was successful run:
$ mlf-core --help
Configuration
mlf-core tightly (optionally, but strongly recommended) integrates with Github and wants to prevent overhead when creating several projects. Therefore mlf-core requires a little bit of configuration before the first usage. To configure mlf-core run:
$ mlf-core config all
Enter your full name, your email and your Github username (hit enter if not available). Next you will be asked whether you want to update your Github personal access token. mlf-core requires your Github access token to automatically create a Github repository to upload your code and to enable mlf-core’s sync functionality (explained later). Hence, answer with y. Now you will be prompted for the token. To create a token go to Github and log in. Next, click on your profile avater and navigate to ‘Settings’.

Click on ‘Settings’.
Now navigate to the ‘Developer settings’.

Click on ‘Developer settings’ in the bottom left. Then access ‘Personal access token’ and click ‘Generate new token in the top right. You should now be prompted for your password. Enter a name for the note that clearly specifies what it is for e.g. ‘mlf-core token’. Tick all options in the following image:

Select all of the in the screenshot ticked options. No additional options are required, especially not repository deletion.
Click ‘Generate token’ at the very bottom and copy your token into the prompt of mlf-core. Hit enter and accept the update. mlf-core is now configured and ready to be used!
For more details including security precautions please visit Configure mlf-core and Github Support.
Creating a mlf-core project
mlf-core offers templates for several machine learning libraries. To get an overview of all available machine learning templates run:
$ mlf-core list
If you want a more detailed overview you can also run:
$ mlf-core info <template-handle/type/library>
A more detailed overview on all available templates is provided here.
In the follow sections we will create and focus on a Pytorch based template identified under the template handle mlflow-pytorch.
The outlined processes work the same for all other templates.
To create a mlf-core project run:
$ mlf-core create
mlflow and pytorch afterwards. Enter a project name, a project description, hit enter for the version prompt and selected a license of your choosing.
MIT and the Apache 2.0 license are common choices. Next, hit the y button when asked whether you want to create a Github repository and push your code to it.
If you select n as in no and create a Github repository manually, mlf-core will not be able to set up required secrets for features such as Docker container building and mlf-core sync.y or n.
The project creation process will now end with mlf-core lint verifying the successful creation if your project and the link to your Github repository being printed.
The project creation process with mlf-core
mlf-core project overview
Using tree we identify the following file structure:
├── .bandit.yml <- Configuration file for Bandit (identifies security issues in the code)
├── CHANGELOG.rst <- Changelog of the project (controlled by mlf-core bump-version)
├── CODE_OF_CONDUCT.rst
├── Dockerfile <- Dockerfile specifying how the Docker container is build; Uses the environment.yml file to create a Conda environment inside the container
├── docs
│ ├── authors.rst
│ ├── changelog.rst
│ ├── code_of_conduct.rst
│ ├── conf.py <- Sphinx configuration file
│ ├── index.rst <- Root of the documentation; defines the toctree
│ ├── make.bat <- Windows version of the Makefile
│ ├── Makefile <- Makefile for the documentation (run make html to build the documentation)
│ ├── model.rst <- Model documentation
│ ├── readme.rst
│ ├── requirements.txt <- Defines Python dependencies for the documentation
│ ├── _static
│ │ └── custom_cookietemple.css <- Custom dark documentation style
│ └── usage.rst <- How to use the mlf-core model
├── .editorconfig <- Configuration for IDEs and editors
├── environment.yml <- Defines all dependencies for your project; Used to create a Conda environment inside the Docker container
├── project_name
│ ├── data_loading
│ │ ├── data_loader.py <- Loading and preprocess training/testing data
│ ├── mlf_core
│ │ └── mlf_core.py <- mlf-core internal code to run system-intelligence and advanced logging; Should usually not be modified
│ ├── model
│ │ ├── model.py <- Model architecture
│ ├── project_name.py <- Entry point for MLflow; Connects all pieces
├── .flake8 <- flake8 configuration file (lints code style)
├── .gitattributes <- git configuration file
├── .github
│ ├── ISSUE_TEMPLATE
│ │ ├── bug_report.md
│ │ ├── feature_request.md
│ │ └── general_question.md
│ ├── pull_request_template.md
│ └── workflows
│ ├── lint.yml <- Runs mlf-core lint and flake8 on push events
│ ├── master_branch_protection.yml <- Protects the master branch from non-release merges
│ ├── publish_docker.yml <- Publishes the Docker container on Github Packages (or alternatives)
│ ├── publish_docs.yml <- Publishes the documentation on Github Pages or Read the Docs
│ ├── sync.yml <- Checks for new mlf-core templates versions and triggers a PR with changes if found; Runs daily
│ └── train_cpu.yml <- Trains the model with a reduced dataset on the CPU
├── .gitignore
├── LICENSE
├── mlf_core.cfg <- mlf-core configuration file (sync, bump-version, linting, ...)
├── .mlf_core.yml <- Meta information of the mlf_core.yml file; Do not edit!
├── MLproject <- MLflow Project file; Defines entry point and parameters
├── README.rst
└── .readthedocs.yml <- Read the Docs configuration file
Now would be a good time to explore the specific files to understand how everything is connected. Do not worry if there appear to be an overwhelming amount of files. With just a little bit of experience you will easily understand which files you should edit and which ones can be safely ignored. We will now examine a couple of files more closely. Note that for visual reasons a couple of lines are removed in this tutorial.
CI & CD with Github Actions
All mlf-core based projects use Github Actions for continous integration (CI) and continous development (CD). As soon as your project is on Github all Github Actions are enabled automatically. The purpose of these workflows will be explained throughout this tutorial.
MLProject
The MLproject file is the primary configuration file for MLflow. It defines with which runtime environment the project is run, configures them and configures MLflow entry points.
name: project_name
# conda_env: environment.yml
docker_env:
image: ghcr.io/github_user/project_name:0.1.0-SNAPSHOT
volumes: ["${PWD}/data:/data"]
environment: [["MLF_CORE_DOCKER_RUN", "TRUE"],["CUBLAS_WORKSPACE_CONFIG", ":4096:8"]]
entry_points:
main:
parameters:
max_epochs: {type: int, default: 5}
gpus: {type: int, default: 0}
accelerator: {type str, default: "None"}
lr: {type: float, default: 0.01}
general-seed: {type: int, default: 0}
pytorch-seed: {type: int, default: 0}
command: |
python project_name/project_name.py \
--max_epochs {max_epochs} \
--gpus {gpus} \
--accelerator {accelerator} \
--lr {lr} \
--general-seed {general-seed} \
--pytorch-seed {pytorch-seed}
mlf-core projects by default run with Docker. If you prefer to run your project with Conda you need to comment in conda_env and comment out
docker_env and its associated configuration. We are currently working on easing this switching, but for now it is a MLflow limitation.
The image by default points to the Docker image build on Github Packages which automatically happens on project creation.
Moreover, all runs mount the data directory in the root folder of the project to /data inside the container.
Therefore, you need to ensure that your data either resides in the data folder of your project or adapt the mounted volumes to include your training data.
mlf-core also presets environment variables required for deterministic machine learning. Do not modify them without an exceptional reason.
Finally, the project_name.py file is set as an entry point and all parameters are defined and passed with MLflow.
Dockerfile
The Dockerfile usually does not need to be adapted. It is based on a custom mlf-core base container which provides CUDA, Conda and other utilities.
FROM mlfcore/base:1.2.0
# Install the conda environment
COPY environment.yml .
RUN conda env create -f environment.yml && conda clean -a
# Activate the environment
RUN echo "source activate exploding_springfield" >> ~/.bashrc
ENV PATH /home/user/miniconda/envs/exploding_springfield/bin:$PATH
# Dump the details of the installed packages to a file for posterity
RUN conda env export --name exploding_springfield > exploding_springfield_environment.yml
The Docker container simply uses the environment.yml file to create a Conda environment and activates it. You can find the base container definitions in the mlf-core containers repository.
environment.yml
The environment.yml file is used for both, running the mlf-core project with Conda, and for creating the Conda environment inside the Docker container.
Therefore you only need to specify your dependencies once in this file.
Try to always define all dependencies from Conda channels if possible and only add PyPI dependencies if a Conda version is not available.
However, note that only the version combinations of the template were tested to be deterministic and to create valid environments.
We encourage you to regularly upgrade your dependencies, but do so at your own risk!
name: project_name
channels:
- defaults
- conda-forge
- pytorch
dependencies:
- defaults::cudatoolkit=11.0.221
- defaults::python=3.8.2
- conda-forge::tensorboardx=2.1
- conda-forge::mlflow=1.13.1
- conda-forge::rich=9.10.0
- pytorch::pytorch=1.7.1
- pytorch::torchvision=0.8.2
- pytorch-lightning==1.1.8
- pip
- pip:
- pycuda==2019.1.2 # not on Conda
- cloudpickle==1.6.0
- boto3==1.17.7
- system-intelligence==2.0.2
If you have dependencies that are not available on Conda nor PyPI you can adapt the Docker container.
Post project creation TODOs
mlf-core tries to automate as much as possible, but some minor actions need to be done manually.
Public Docker container on Github Packages
mlf-core by default pushes the Docker container using the publish_docker.yml Github Actions workflow to Github Packages.
If you want to push your Docker container to a different registry you need to adapt the workflow and potentially update the username and add a Github secret for your password.
By default, containers pushed to Github are private. As a result you would need to log in to pull the container.
Hence, you have to make your Docker container public by navigating to the used Github account, selecting Packages and then your package.

As of writing this, there is a bug with the GitHub UI, that doesn’t show private images without selecting the visibility. Click visibility, and then private, and select your docker image.


On the right you will find a button package settings.

Scroll down on the package settings page and at the bottom you will find a button Change visibility.

Select Public, type in your project name, click it, authenticate and your Github container is now public!

Be aware of the fact that building the Docker container usually takes 15-20 minutes and therefore your Docker container will not immediately show up in the Packages tab.
Publish documentation on Github Pages or Read the Docs
mlf-core projects offers a Sphinx based documentation setup which can easily be hosted on either Github Pages or Read the Docs. The choice is yours. Note that you may need to update the badge in the README of your project.
Github Pages
The publish_docs.yml Github action pushes your built documentation automatically to a branch called gh-pages.
Hence, you only need to enable Github Pages on this branch.
Please follow the final steps (6-8 at time of writing) of the official Github - creating your site documentation.
Read the Docs
Please follow the offical Read the Docs - Building your documentation documentation.
Training models with mlf-core
mlf-core models are designed to easily run on any hardware with the same runtime environment.
First, select the runtime environment by commenting either Conda or Docker in or out as described above.
Depending on the used template the commands for training a model on the CPU, a GPU or multiple GPUs may slightly differ.
In all cases they are described in the usage.rst file.
Remember that MLflow parameters are passed as -P key=val and Docker parameters as -A key=val or -A key.
For our just created mlflow-pytorch project, assuming that we are in the root directory of the project, we run our project as follows:
CPU
$ mlflow run . -A t
Single GPU
$ mlflow run . -A t-A gpus=all -P gpus=1
Multiple GPUs
$ mlflow run . -A t-A gpus=all -P gpus=2 -P acc=ddp
This will train our model on 2 gpus with the distributed data parallel accelerator.
Adjust the number of GPUs to your liking.
Interactive visualization
Congratulations, you have just trained your first GPU deterministic model! All metrics and models are saved in the mlruns directory.
A couple of metrics were already printed onto the terminal. However, due to the tight MLflow integration there are more ways to visualize our results.
mlflow UI
To open the mlflow UI simply run mlflow ui in the root directory of your project.
Note that if you trained on a different machine than you now want to open the MLflow web interface, you should run mlf-core fix-artifact-paths on the local machine.
This will ensure that all artifacts are visible. Open the URL shown in the terminal in your browser.
You should be greeted with something like this:

Landing page of the MLflow web interface.
All runs are grouped into experiments together with a run status. Simply click on a specific run to see more details:

Detailed overview of a MLflow run.
When clicking on one of the metrics you can also view for example a line plot of the performance over time or per epoch.

Plot of the training epochs of a run.
The MLflow web interface can also be hosted somewhere and be made accessible to other collaborators. Consult the MLflow documentation for this purpose.
Tensorboard
At the end of the run the project will print out a command to view your just trained model with Tensorboard. Simply run the command and open the URL in your favorite browser.
Serving a mlf-core model
A benefit of MLflow is that it allows you to easily serve your model to make it available to other users:
$ mlflow models serve -m <path to the model>
will spin up a server to which you can send requests to and will receive predictions as answers! Please follow the MLflow deployment documentation.
Developing mlf-core projects
mlf-core offers additional functionality that eases development. A subset of these features and general development tips are the focus of this section.
git branches and development flow
As soon as your project is pushed to Github you will see that four branches are used:
A
master/mainbranch. This branch should at any point only contain the latest release.A
developmentbranch. Use this branch to collect all development milestones.A
TEMPLATEbranch. This branch is used for syncing (see below). Do not touch it.A
gh-pagesbranch. The built documentation is pushed to this branch. You should not have to edit it manually.
While developing always merge first into the development branch.
If you think that your code is ready to become a new release create a release branch such as: release-1.0.0.
Now open a pull request from the release branch into the master branch and have any collaborators review it.
When ready merge it into the master branch and create a new Github release. This will trigger a release build of your Docker container.
Rebuilding the Docker container
Whenever you add new libraries to the environment.yml file simply push to the development branch.
Your Docker container will rebuild and overwrite the latest development container.
Increasing the project version with mlf-core bump-version
Increasing the version of a project across several files is cumbersome.
Hence, mlf-core offers a mlf-core bump-version command.
Considering that a usual project starts as a 0.1.0-SNAPSHOT version (SNAPSHOT equals unstable development version) you should,
following the development flow introduced above, increase the version on the release branch:
$ mlf-core bump-version 0.1.0 .
This will update the version of all files and add a new section in the changelog which you should continously keep up to date. For more details please visit Bumping the version of an existing project.
Ensuring determinism with mlf-core lint
Determinism is the heart and soul of mlf-core projects. Ideally you, as a user of mlf-core, do not need to know how mlf-core ensures determinism behind the scenes. The only thing that you have to do is to periodically run:
$ mlf-core lint
on your project. You will be made aware of any violations of known non-determinism and how to fix them. This ensures that you can fix the issues by yourself and learn in the process without requiring expert knowledge beforehand.

Example of a mlf-core lint run. The usage of the function bincount was found, which is known to operate non-deterministically. It has to be replaced.
mlf-core lint is also run on any push event to any branch on your Github repository.
For more details please read Linting your project.
Utilizing the MLFCore singleton class
When you start to build your model you will notice several MLFCore function calls already built in.
These calls set all required random seeds and log the hardware together with the runtime environment.
Moreover, the MLFCore singleton allows for data tracking with MD5 sums.
These functions can be found in mlf_core/mlf_core.py if you want to peak under the hood.
Usually they should neither be modified nor removed without any strong reason.
It’s also maintained by the linter in-case anything gets changed on accident.
To log your input data use:
from mlf_core.mlf_core import MLFCore
MLFCore.log_input_data('data/')
Keeping mlf-core based projects up to data with mlf-core sync
mlf-core continously tries to update all project templates to adhere to the latest best practices and requirements for deterministic machine learning. Whenever mlf-core releases a new version and updated templates you will automatically receive a pull request with the latest changes. You should then try to integrate them as fast as possible and to create a minor release.
For more details and configuration options please visit Syncing your project.
Contributing to mlf-core
There are various ways of contributing to mlf-core. First you can make your best practice model available by forking your project to the mlf-core organization or by developing it there directly. Be aware that we would like to discuss this first with you to ensure that only well developed or finished projects are in the mlf-core organization. This increases the visibility of your project and is a seal of quality. Moreover, you can join the Community Discord via this link. We are looking forward to meeting you and are always available to help if required!
Installation
Stable release
To install mlf-core, run this command in your terminal:
$ pip install mlf-core
This is the preferred method to install mlf-core, as it will always install the most recent stable release.
If you don’t have pip installed, this Python installation guide can guide you through the process.
From sources
The sources for mlf-core can be downloaded from the Github repo. Please note that you require poetry to be installed.
You can either clone the public repository:
$ git clone git://github.com/mlf-core/mlf-core
Or download the tarball:
$ curl -OJL https://github.com/mlf-core/mlf-core/tarball/master
Once you have a copy of the source, you can install it with:
$ make install
General Usage
In the following an overview of mlf-core’s main commands is given. Please note that all commands are explained more in depth in their respective documentation point. You can use the menu on the left to navigate to them.
create
create is the heart of mlf-core.
It starts the project creation process and guides the user through domain selection, language/framework selection and prompts for all required configuration parameters such as name, email and many more.
Additionally, the project is linted after creation to ensure that everything went well.
The user also has the option to push his just created project directly to Github.
Invoke create by running
$ mlf-core create
For more details about project creation please visit Create a project and for a detailed list of all available templates please visit Available templates.
list
list allows you to list all available templates.
The list command prints the name, handle, short description, available libraries for the template and its version to the console.
Note that the long description is emitted and the info command should be used to get a long description of the template.
Invoke list by running
$ mlf-core list
For more details please visit Getting information about available templates.
info
info provides detailed information about a specific template or set of templates.
It prints the name, handle, long description, available libraries and version of the selected subset or specific template.
Invoke info by running
$ mlf-core info <HANDLE>
For more details please visit Getting information about available templates.
lint
lint ensures that the template adheres to mlf-core’s standards.
When linting an already existing project several general checks, which all templates share are performed and afterwards template specific linting functions are run.
All results are collected and printed to the user. If any of the checks fail linting terminates.
Invoke lint by running
$ mlf-core lint
For more details please visit Linting your project.
fix-artifact-paths
fix-artifact-paths fixes absolute paths, which do not match on the current machine.
This is especially useful when training on a remote machine, saving all runs locally and then transferring to another machine with different file paths.
Invoke fix-artifact-paths by running
$ mlf-core fix-artifact-paths <PATH>
For more details please visit Fixing the paths of locally saved MLflow runs.
bump-version
bump-version conveniently bumps the version of a mlf-core based project across several files.
Default configurations for bump-version are shipped with the template and can be extended if the user so desires.
All lines where the version was changed are printed to the console.
Invoke bump-version by running
$ mlf-core bump-version <NEWVERSION> <PATH>
For more details please visit Bumping the version of an existing project.
sync
sync checks for a project whether a newer version of the used template is available.
If so, a pull request with only the changes of the newer template version is created against the development/last active branchh.
Invoke sync by running
$ mlf-core sync
For more details please visit Syncing your project.
config
config sets commonly used defaults for the project creation.
Moreover, it is required for mlf-core’s Github support, since it takes care of the personal access token (PAT).
Invoke config by running
$ mlf-core config <all/general/pat>
For more details please visit Configure mlf-core and Github Support.
upgrade
upgrade checks whether a new version is available on PyPI and upgrades the version if not.
Invoke upgrade by running
$ mlf-core upgrade
For more details please visit Upgrade mlf-core.
External Python based projects
To use mlf-core in an external Python based project
import mlf-core
Create a project
Creating projects from templates is the heart of mlf-core. Our templates adhere to best practices and try to be as modern as possible. Furthermore, they try to automate tasks such as automatical dependency resolvement and installation, packaging, deployment and more. To learn more about our templates please visit Available templates and check out your template of interest.
Usage
The creation of a new project can be invoked by
$ mlf-core create <<output-path>>
- which will guide you through the creation process of your (customized) project via prompts and creates your project in the specified directory (if none was given,
this will be the current working directory). If you do not have mlf-core configured yet, you will be asked to do so. For more details please visit Configure mlf-core.
The prompts follow the pattern of domain (e.g. mlflow, package, …), subdomain (if applicable, e.g. website), framework (e.g. Pytorch) followed by template specific prompts (e.g. testing frameworks, …). The project will be created at the current working directory, where mlf-core has been called.
After the project has been created, linting (see Linting your project) is automatically performed to verify that the template creation process was successful.
Finally, you will be asked whether you want to automatically push your new project to Github. Note that for this purpose you need to have mlf-core configured with a Github personal access token. For more details about the Github support please visit Github Support.
Flags
--domain: To directly create a template of the the corresponding domain.All further prompts will still be asked for. Example:
mlflow. It is also possible to directly create a specific template using its handle
Getting information about available templates
Although, information on all mlf-core templates is provided in Available templates in our documentation, it is often times more convenient to get a quick overview from the commandline.
Hence, mlf-core provides two commands list and info, which print information on all available templates with different levels of detail.
list
mlf-core list is restricted to the short descriptions of the templates. If you want to read more about a specific (sets of) template, please use the info command.

Example output of mlf-core list. Note that the content of the output is of course subject to change.
Usage
mlf-core list can be invoked via
$ mlf-core list
info
The info command should be used when the short description of a template is not sufficient and a more detailed description of a specific template is required.

Example output of mlf-core info.
Usage
Invoke mlf-core info via
$ mlf-core info <HANDLE/FRAMEWORK/DOMAIN>
HANDLE: a mlf-core template handle such asmlflow-pytorch.DOMAIN: a domain for which mlf-core provides templates for. Example:mlflow.FRAMEWORK: A framework or library for which mlf-core provides templates for. Example:pytorch.
Linting your project
Linting is the process of statically analyzing code to find code style violations and to detect errors. mlf-core implements a custom linting system, but depending on the template external tools linting tools may additionally be called.
Usage
mlf-core lint can be invoked on an existing project using
$ mlf-core lint <OPTIONS> <PATH>
mlf-core’s linting is divided into three distinct phases.
All linting functions, which all templates share are called and the results are collected.
Template specific linting functions are invoked and the results are appended to the results of phase 1
Template specific external linters are called (e.g. autopep8 for Python based projects)
The linting results of the first two phases are assigned into 3 groups:
Passed
Passed with warning
Failed
If any of the checks failed linting stops and returns an error code.
Linting applied to a newly created mlflow-pytorch project.
To examine the reason for a failed linting test please follow the URL. All reasons are explained in the section Linting codes.
Linting codes
The following error or warning numbers correspond to errors found during linting. If you are not sure why a specific linting error has occurred you may find more information using the respective error code.
General
general-1
general-2
general-3
mlf-core TODO: TODO mlf-core: or strings in the respective files. Usually, they point to things that should be
manually configured or require other attention. You may remove them if there is no task for you to be solved.general-4
general-5
mlf-core bump-version.general-6
changelog.rst invalid. The changelog.rst file requires that every changelog section has a header with the version and the corresponding release date.
The version above another changelog section should always be greater than the section below (e.g. 1.1.0 above 1.0.0).
Every section must have the headings **Added**, **Fixed**, **Dependencies** and **Deprecated**.mlflow-pytorch
mlflow-pytorch-1
mlflow-pytorch-2
1 trainer.deterministic = True,
2 trainer.benchmark = False,
3 set_general_random_seeds(general_seed),
4 set_pytorch_random_seeds(pytorch_seed, num_of_gpus)
mlflow-pytorch-3
1'index_add',
2'scatter_add',
3'bincount',
4'embedding_bag',
5'ctc_loss',
6'interpolate',
7'repeat_interleave',
8'index_select'
mlflow-tensorflow
mlflow-tensorflow-1
mlflow-tensorflow-2
1set_general_random_seeds(dict_args["general_seed"]),
2set_tensorflow_random_seeds(dict_args["tensorflow_seed"])
3def set_tensorflow_random_seeds(seed):
4 tf.random.set_seed(seed)
5 tf.config.threading.set_intra_op_parallelism_threads = 1 # CPU only
6 tf.config.threading.set_inter_op_parallelism_threads = 1 # CPU only
7 os.environ['TF_DETERMINISTIC_OPS'] = '1'
mlflow-tensorflow-3
1'softmax_cross_entropy_with_logits',
2'sparse_softmax_cross_entropy_with_logits'
mlflow-xgboost
mlflow-xgboost-1
mlflow-xgboost-2
1set_general_random_seeds(dict_args["general_seed"]),
2set_xgboost_random_seeds(dict_args["xgboost_seed"], param)
3def set_xgboost_random_seeds(seed, param):
4 param['seed'] = seed
mlflow-xgboost-3
mlflow-xgboost-4
all_reduce algorithm in XGBoost may not operate deterministically.mlflow-xgboost_dask
mlflow-xgboost_dask-1
mlflow-xgboost_dask-2
1set_general_random_seeds(dict_args["general_seed"]),
2set_xgboost_dask_random_seeds(dict_args["xgboost_seed"], param)
3def set_xgboost_random_seeds(seed, param):
4 param['seed'] = seed
mlflow-xgboost_dask-3
mlflow-xgboost-4
all_reduce algorithm in XGBoost may not operate deterministically.Fixing the paths of locally saved MLflow runs
Often times the development and the training machines are not the same.
However, when trying to view the artifacts on the development machine, the paths to the artifacts defined in the meta.yaml files do not match anymore.
This is only of concern when saving artifacts locally and not remotely to for example AWS S3.
To automatically fix the paths locally mlf-core offers a fix-artifact-paths command.
Usage
To fix the paths run
$ mlf-core fix-artifact-paths <PATH>
PATHis the root folder of themlrunsdirectory
Bumping the version of an existing project
Increasing the version of an already existing project is often times a cumbersome and error prone process, since the version has to be changed in multiple places.
To facilitate this process, mlf-core provides a bump-version command, which conveniently increases the version across several files.
Additionally, bump-version inserts a new section into the changelog using the specified new version.
New Version (Date)
------------------
**Added**
**Fixed**
**Dependencies**
**Deprecated**
bump-version will verify that your new version adheres to semantic versioning and that you are not trying to update it unreasonably. It is for example not allowed to bump from 2.0.0 to 7.1.2, since in a normal development workflow only 2.0.1, 2.1.0 or 3.0.0 adhere to consecutive semantic versioning. Note that SNAPSHOT versions are allowed! However, it must still follow semantic versioning. Version 1.2.5 therefore cannot be the predecessor of 1.2.5-SNAPSHOT, but only 1.2.4.
Usage
The bump-version command follows the syntax
$ mlf-core bump-version <OPTIONS> X.X.X <PATH>
X.X.X: The new version, where theXcorrespond to integers adhering to consecutive semantic versioning. You may append-SNAPSHOT.PATH[CWD]: The path to themlf_core.cfgfile, which contains all locations, where the version should be increased.
Flags
--downgrade: To downgrade a version.The changelog won’t be modified. Only use this option as a last resort if something went horribly wrong in your development process. In a normal development workflow, this should never be necessary.
--project-version: To get the current project version.No version bumping will be triggered. Using this flag will cancel any commands executed after and exits the program.
Configuration
All templates of mlf-core ship with a mlf-core.cfg file, which defines all files bump-version examines.
The bump-version configuration begins with the section:
[bumpversion]
current_version = 0.1.0
where the current version is defined. All files are either white- or blacklisted (see below for explanations).
An arbitrary name is followed by the path to the file: arbitrary_name = path_to_file.
Whitelisted files are listed below a [bumpversion_files_whitelisted] section, e.g.:
[bumpversion_files_whitelisted]
dot_mlf-core = .mlf-core.yml
conf_py = docs/conf.py
All files, which are whitelisted are searched for patterns matching X.X.X, which are updated to the specified new versions.
Any lines, which contain the string <<mlf-core_NO_BUMP>> will be ignored.
If files, like Maven pom.xml files, contain many version patterns matching X.X.X, it may be a better idea to blacklist them (section [bumpversion_files_blacklisted]) and enable only specific lines to be updated:
[bumpversion_files_blacklisted]
pom = pom.xml
Analogously to whitelisted files, which allow for specific lines to be ignored, blacklisted files allow for specific lines to be forcibly updated using the string <<mlf-core_FORCE_BUMP>>.
Note that those tags must be on the same line as the version (commonly placed in a comment), otherwise they wont work!
Syncing your project
Syncing is supposed to integrate any changes to the mlf-core templates back into your already existing project.
When mlf-core sync is invoked, mlf-core checks whether a new version of the corresponding template for the current project is available.
If so, mlf-core creates a temporary project with the most recent template and pushes it to the TEMPLATE branch.
Next, a temporary sync branch is created to avoid pushing and manipulating the TEMPLATE branch (called mlf_core_sync_v_<<new-version>> with new-version being the
updated templates version). Finally, a pull request is submitted to the development branch from this branch.
The syncing process is configurable by setting the desired lower syncing boundary level and blacklisting files from syncing (see Enable/Disable sync).
Requirements for sync
For syncing to work properly, your project has to satisfy a few things:
A Github repository with your projects code (private or public, organization or non-organization repository).
An unmodified
.mlf_core.ymlfile. If you modify this file, which you should never do, syncing may not be able to recreate the project with the most recent template.An active repository secret called
CT_SYNC_TOKENfor your project’s repository containing the encrypted personal access token with at leastreposcope.A running, unmodified workflow called
sync_project.yml. Modifying this workflow should never be done and results in undefined sync behaviour.
Points 3 and 4 are only required when not syncing manually.
Usage
To sync your project manually, simply run
$ mlf-core sync [PROJECT_DIR] [PAT] [GITHUB_USERNAME]
PROJECT_DIR[CWD] : The path to themlf_core.cfgfile.PAT[Configured pat] : A Github personal access token with at least thereposcope. Thesync_project.ymlGithub workflow uses the PAT set as a Github secret.GITHUB_USERNAME[Configured username] : The Github username to submit a pull request from. The supplied PAT has to be associated with this username.
Flags
--set-token: UpdateCT_SYNC_SECRETof your project’s repo to a new PAT. Note that the Github username and the PAT must still match for automatic syncing to work.check-update: Check, whether a new release of a template for an already existing project is available.
Configuring sync
Enable/Disable sync
Mlf-core aims to provide the user as much configuration as possible. So, the sync feature is optional and should also
be switched on or off. If you want to enable sync (which is the default), the sync_enable accepts the following values: True, true, Yes, yes, Y, y. To disable sync,
simply change this value into False, false, No, no, N, n. It can be configured in the:
[sync]
sync_enabled = True
section.
Sync level
Since mlf-core strongly adheres to semantic versioning our templates do too. Hence, it is customizable whether only major, minor or all (= patch level) releases of the template should trigger mlf-core sync. The sync level therefore specifies a lower boundary. It can be configured in the:
[sync_level]
ct_sync_level = minor
section.
Blacklisting files
Although, mlf-core only submits pull requests for files, which are part of the template, sometimes even those files should be ignored.
Examples could be any html files, which ,at some point, contain only custom content and should not be synced.
When syncing, mlf-core examines the mlf_core.cfg file and ignores any file patterns (globs) (e.g. *.html) below the [sync_files_blacklisted] section.
IMPORTANT NOTE: If you would like to add some files to this section, make sure your current branch (if you are syncing manually, which is not recommended) or your default branch
has the latest blacklisted sync file section with your changes, so it will be used by the sync.
Configure mlf-core
To prevent frequent prompts for information, which rarely or never changes at all such as the full name, email or Github username of the user, mlf-core uses a configuration file.
Moreover, the personal access token associated with the Github username is stored, in encrypted form, to allow for various Github functionalities, such as automatic Github repository creation or Syncing your project.
The creation of projects with mlf-core requires a configuration file. A personal access token is not required, if Github support is not used.
The configuration file is saved operating system dependent in common config file locations (~/.config/mlf-core on Unix, C:\Users\Username\AppData\Local\mlf-core\mlf-core on Windows).
Configuring mlf-core is only required once, although it is always possible to update the current configuration.
Usage
Invoke mlf-core config via
$ mlf-core config <all/general/pat>
all: Prompt for the full name, email, Github username and Github personal access token.general: Only prompt for the full name, email and the Github username.These details are required to create projects.
pat: Solely prompts for the Github personal access token and updates it if already set.Ensure that your Github username still matches with the new personal access token. If not you should also update your Github username via
mlf-core config general. Additionally, any of your already created projects may still feature your old token and you may therefore run into issues when attempting to push. Hence, you must also update your remote URL for those projects!
Flags
--view: To get your current mlf-core configuration.The explicit value of your Github personal access token will not be printed. You will only be informed about whether it is set or not.
On Github personal access tokens
mlf-core’s Github support requires access to your Github repositories to create repositories, add issues labels and set branch protection rules.
Github manages these access rights through Personal Access Tokens (PAT).
If you are using mlf-core’s Github support for the first time mlf-core config pat will be run and you will be prompted for your Github PAT.
Please refer to the official documentation on how to create one.
mlf-core only requires repo access, so you only need to tick this box. This ensures that your PAT would not even allow for the deletion of repositories.
mlf-core then encrypts the Personal Access Token, adds the encrypted token to the mlf_core_conf.cfg file and saves the key locally in a hidden place.
This is safer than Github’s official way, which recommends the usage of environment variables or Github Credentials, which both save the token in plaintext.
It is still strongly advised to secure your personal computer and not allow any foe to get access.
Upgrade mlf-core
Every time mlf-core is run it will automatically contact PyPI to check whether the locally installed version of mlf-core is the latest version available.
If a new version is available mlf-core can be trivially upgraded. Note that pip must be available in your PATH.
It is advised not to mix installations using setuptools directly and pip. If you are not a developer of mlf-core this should not concern you.
Usage
$ mlf-core upgrade
Available templates
cookietemple currently has the following templates available:
In the following every template is devoted its own section, which explains its purpose, design, included frameworks/libraries, usage and frequently asked questions. A set of frequently questions, which all templates share see here: Shared FAQ FAQ. It is recommended to use the sidebar to navigate this documentation, since it is very long and cumbersome to scroll through.
mlflow-pytorch
Purpose
mlflow-pytorch is a MLflow based template designed for Pytorch machine learning models. Additionally, Pytorch Lightning abstracts away boilerplate code. The project is fully CPU and GPU deterministic with system-intelligence integration. Additionally, Conda and Docker are supported out of the box.
Design
The package follows the mlf-core convention of a single environment.yml file in conjunction with an mlf-core based Dockerfile. As required a MLproject file serves as entry point and for parameter definitions.
├── AUTHORS.rst
├── .bandit.yml
├── CHANGELOG.rst
├── CODE_OF_CONDUCT.rst
├── Dockerfile
├── docs
│ ├── authors.rst
│ ├── changelog.rst
│ ├── code_of_conduct.rst
│ ├── conf.py
│ ├── index.rst
│ ├── make.bat
│ ├── Makefile
│ ├── model.rst
│ ├── readme.rst
│ ├── requirements.txt
│ ├── _static
│ │ └── custom_cookietemple.css
│ └── usage.rst
├── .editorconfig
├── environment.yml
├── project_slug
│ ├── data_loading
│ │ ├── data_loader.py
│ ├── project_slug.py
│ ├── mlf_core
│ │ ├── mlf_core.py
│ ├── model
│ │ ├── model.py
├── .flake8
├── .github
│ ├── ISSUE_TEMPLATE
│ │ ├── bug_report.md
│ │ ├── feature_request.md
│ │ ├── general_question.md
│ │ └── sync_notify.md
│ ├── pull_request_template.md
│ └── workflows
│ ├── build_docs.yml
│ ├── run_mlf_core_lint.yml
│ ├── pr_to_master_from_patch_release_only.yml
│ ├── run_bandit.yml
│ ├── run_flake8_linting.yml
│ ├── sync.yml
│ └── train_cpu.yml
│ └── publish_docker.yml
├── .gitignore
├── LICENSE
├── mlf_core.cfg
├── .mlf_core.yml
├── MLproject
├── README.rst
└── .readthedocs.yml
Included frameworks/libraries
MLflow as the primary framework for parameter and artifact logging.
Pytorch as the primary machine learning library.
system-intelligence to fetch all hardware related information.
Preconfigured readthedocs
Seven Github workflows:
build_docs.yml, which builds the readthedocs documentation.
run_flake8_linting.yml, which runs flake8 linting.
pr_to_master_from_patch_release_only.ymlPlease read pr_to_master_from_patch_release_only workflow.
train_cpu.yml, which trains the model on the CPU for a small number of epochs. Requires the data to be accessible.
sync.yml, which checks whether a new version of mlflow-pytorch is available and submits a pull request if so.
run_mlf_core_lint.yml, which runsmlf-core lintto verify that the project adheres to all mlf-core standards.
run_bandit.yml, which runs Bandit to find any security issues.
publish_docker.yml, which builds and pushes a Docker container to Github Packages
Usage
It is strongly advised to use Docker to run mlf-core models, since support for other OS besides Linux is limited and dependency management is greatly simplified.
Building the Docker container
The name (=tag) of the Docker Container is specified in the MLproject file in image:.
If you created your project with mlf-core’s Github support your Docker container should automatically be building in your Github Container Registry.
Furthermore, it should match the name specified in the MLproject file.
If the Docker container is not available in your Github Container Registry for any reason you must build it locally.
Run: docker build -t ghcr.io/GITHUB_USERNAME/PROJECT_SLUG:version ., where PROJECT_SLUG is your project’s name and version the current project version.
The MLproject file can always be examined to determine the required Docker container tag.
Running the project with Docker
After having build the Docker container you can now launch your project with mlflow run ..
The Docker container will automatically spin up.
Note if you want to run your project with GPU support you must have the NVIDIA Container Toolkit installed.
Moreover, you need to pass additional Docker runtime arguments e.g. mlflow run . -A gpus=all, which makes all available GPUs accessible to the Docker container.
Running the project with Conda
Running the project using Conda is possible, but discouraged, since system-intelligence currently only really supports Linux.
Comment out docker_env and comment in conda_env. Now run the project using e.g. mlflow run ..
GPUs will be automatically be detected and used.
FAQ
I am using Docker but no GPUs are used for training!
Please ensure that you have CUDA configured, the NVIDIA Container Toolkit installed and pass -A gpus=all when running the project.
mlflow-tensorflow
Purpose
mlflow-tensorflow is a MLflow based template designed for Tensorflow (version 2+) machine learning models. The project is fully CPU and GPU deterministic with system-intelligence integration. Additionally, Conda and Docker are supported out of the box.
Design
The package follows the mlf-core convention of a single environment.yml file in conjunction with an mlf-core based Dockerfile. As required a MLproject file serves as entry point and for parameter definitions.
├── AUTHORS.rst
├── .bandit.yml
├── CHANGELOG.rst
├── CODE_OF_CONDUCT.rst
├── Dockerfile
├── docs
│ ├── authors.rst
│ ├── changelog.rst
│ ├── code_of_conduct.rst
│ ├── conf.py
│ ├── index.rst
│ ├── make.bat
│ ├── Makefile
│ ├── model.rst
│ ├── readme.rst
│ ├── requirements.txt
│ ├── _static
│ │ └── custom_cookietemple.css
│ └── usage.rst
├── .editorconfig
├── environment.yml
├── exploding_springfield
│ ├── data_loading
│ │ ├── data_loader.py
│ ├── exploding_springfield.py
│ ├── mlf_core
│ │ ├── mlf_core.py
│ ├── model
│ │ ├── model.py
│ └── training
│ └── train.py
├── .flake8
├── .github
│ ├── ISSUE_TEMPLATE
│ │ ├── bug_report.md
│ │ ├── feature_request.md
│ │ ├── general_question.md
│ │ └── sync_notify.md
│ ├── pull_request_template.md
│ └── workflows
│ ├── build_docs.yml
│ ├── mlf_core_lint.yml
│ ├── pr_to_master_from_patch_release_only.yml
│ ├── run_bandit.yml
│ ├── run_flake8_linting.yml
│ ├── sync.yml
│ └── train_cpu.yml
│ └── publish_docker.yml
├── .gitignore
├── LICENSE
├── mlf_core.cfg
├── .mlf_core.yml
├── MLproject
├── README.rst
└── .readthedocs.yml
Included frameworks/libraries
MLflow as the primary framework for parameter and artifact logging.
Tensorflow (version 2+) as the primary machine learning library.
system-intelligence to fetch all hardware related information.
Preconfigured readthedocs
Five Github workflows:
build_docs.yml, which builds the readthedocs documentation.
run_flake8_linting.yml, which runs flake8 linting.
pr_to_master_from_patch_release_only.ymlPlease read pr_to_master_from_patch_release_only workflow.
train_cpu.yml, which trains the model on the CPU for a small number of epochs. Requires the data to be accessible.
sync.yml, which checks whether a new version of mlflow-pytorch is available and submits a pull request if so.
run_mlf_core_lint.yml, which runsmlf-core lintto verify that the project adheres to all mlf-core standards.
run_bandit.yml, which runs Bandit to find any security issues.
publish_docker.yml, which builds and pushes a Docker container to Github Packages
Usage
It is strongly advised to use Docker to run mlf-core models, since support for other OS besides Linux is limited and dependency management is greatly simplified.
Building the Docker container
The name (=tag) of the Docker Container is specified in the MLproject file in image:.
If you created your project with mlf-core’s Github support your Docker container should automatically be building in your Github Container Registry.
Furthermore, it should match the name specified in the MLproject file.
If the Docker container is not available in your Github Container Registry for any reason you must build it locally.
Run: docker build -t ghcr.io/GITHUB_USERNAME/PROJECT_SLUG:version ., where PROJECT_SLUG is your project’s name and version the current project version.
The MLproject file can always be examined to determine the required Docker container tag.
Running the project with Docker
After having build the Docker container you can now launch your project with mlflow run ..
The Docker container will automatically spin up.
Note if you want to run your project with GPU support you must have the NVIDIA Container Toolkit installed.
Moreover, you need to pass additional Docker runtime arguments e.g. mlflow run . -A gpus=all, which makes all available GPUs accessible to the Docker container.
Running the project with Conda
Running the project using Conda is possible, but discouraged, since system-intelligence currently only really supports Linux.
Comment out docker_env and comment in conda_env. Now run the project using e.g. mlflow run ..
GPUs will be automatically be detected and used.
FAQ
I am using Docker but no GPUs are used for training!
Please ensure that you have CUDA configured, the NVIDIA Container Toolkit installed and pass -A gpus=all when running the project.
mlflow-xgboost
Purpose
mlflow-xgboost is a MLflow based template designed for XGBoost machine learning models. The project is fully CPU and GPU deterministic with system-intelligence integration. Additionally, Conda and Docker are supported out of the box.
Design
The package follows the mlf-core convention of a single environment.yml file in conjunction with an mlf-core based Dockerfile. As required a MLproject file serves as entry point and for parameter definitions.
├── AUTHORS.rst
├── .bandit.yml
├── CHANGELOG.rst
├── CODE_OF_CONDUCT.rst
├── Dockerfile
├── docs
│ ├── authors.rst
│ ├── changelog.rst
│ ├── code_of_conduct.rst
│ ├── conf.py
│ ├── index.rst
│ ├── make.bat
│ ├── Makefile
│ ├── model.rst
│ ├── readme.rst
│ ├── requirements.txt
│ ├── _static
│ │ └── custom_cookietemple.css
│ └── usage.rst
├── .editorconfig
├── environment.yml
├── exploding_springfield
│ ├── data_loading
│ │ ├── data_loader.py
│ ├── exploding_springfield.py
│ ├── mlf_core
│ │ ├── mlf_core.py
├── .flake8
├── .github
│ ├── ISSUE_TEMPLATE
│ │ ├── bug_report.md
│ │ ├── feature_request.md
│ │ ├── general_question.md
│ │ └── sync_notify.md
│ ├── pull_request_template.md
│ └── workflows
│ ├── build_docs.yml
│ ├── mlf_core_lint.yml
│ ├── pr_to_master_from_patch_release_only.yml
│ ├── run_bandit.yml
│ ├── run_flake8_linting.yml
│ ├── sync.yml
│ └── train_cpu.yml
│ └── publish_docker.yml
├── .gitignore
├── LICENSE
├── mlf_core.cfg
├── .mlf_core.yml
├── MLproject
├── README.rst
└── .readthedocs.yml
Included frameworks/libraries
MLflow as the primary framework for parameter and artifact logging.
XGBoost as the primary machine learning library.
system-intelligence to fetch all hardware related information.
Preconfigured readthedocs
Five Github workflows:
build_docs.yml, which builds the readthedocs documentation.
run_flake8_linting.yml, which runs flake8 linting.
pr_to_master_from_patch_release_only.ymlPlease read pr_to_master_from_patch_release_only workflow.
train_cpu.yml, which trains the model on the CPU for a small number of epochs. Requires the data to be accessible.
sync.yml, which checks whether a new version of mlflow-pytorch is available and submits a pull request if so.
run_mlf_core_lint.yml, which runsmlf-core lintto verify that the project adheres to all mlf-core standards.
run_bandit.yml, which runs Bandit to find any security issues.
publish_docker.yml, which builds and pushes a Docker container to Github Packages
Usage
It is strongly advised to use Docker to run mlf-core models, since support for other OS besides Linux is limited and dependency management is greatly simplified.
Building the Docker container
The name (=tag) of the Docker Container is specified in the MLproject file in image:.
If you created your project with mlf-core’s Github support your Docker container should automatically be building in your Github Container Registry.
Furthermore, it should match the name specified in the MLproject file.
If the Docker container is not available in your Github Container Registry for any reason you must build it locally.
Run: docker build -t ghcr.io/GITHUB_USERNAME/PROJECT_SLUG:version ., where PROJECT_SLUG is your project’s name and version the current project version.
The MLproject file can always be examined to determine the required Docker container tag.
Running the project with Docker
After having build the Docker container you can now launch your project with mlflow run ..
The Docker container will automatically spin up.
Note if you want to run your project with GPU support you must have the NVIDIA Container Toolkit installed.
Moreover, you need to pass additional Docker runtime arguments e.g. mlflow run . -A gpus=all, which makes all available GPUs accessible to the Docker container.
Running the project with Conda
Running the project using Conda is possible, but discouraged, since system-intelligence currently only really supports Linux.
Comment out docker_env and comment in conda_env. Now run the project using e.g. mlflow run ..
GPUs will be automatically be detected and used.
FAQ
I am using Docker but no GPUs are used for training!
Please ensure that you have CUDA configured, the NVIDIA Container Toolkit installed and pass -A gpus=all when running the project.
package-prediction
Purpose
package-prediction is a template designed to easily distribute PyPI packages of machine learning models. The template only provides the boilerplate code to load models and perform predictions. Data wrangling or model training should be done using the mlflow templates.
Design
The package is closely related to cookietemple’shttps://github.com/cookiejar/cookietemple cli-python template. It is primarily based on setuptools to build the package and uses a Github workflow to easily upload the package to PyPI. Any prediction boiler code is machine learning library specific.
├── AUTHORS.rst
├── .bandit.yml
├── CHANGELOG.rst
├── CODE_OF_CONDUCT.rst
├── .coveragerc
├── Dockerfile
├── docs
│ ├── authors.rst
│ ├── changelog.rst
│ ├── code_of_conduct.rst
│ ├── conf.py
│ ├── index.rst
│ ├── installation.rst
│ ├── make.bat
│ ├── Makefile
│ ├── readme.rst
│ ├── requirements.txt
│ ├── _static
│ │ └── custom_cookietemple.css
│ └── usage.rst
├── .editorconfig
├── exploding_springfield
│ ├── cli_pytorch.py
│ ├── cli_tensorflow.py
│ ├── cli_xgboost.py
│ ├── data
│ │ └── xgboost_test_data.tsv
│ ├── __init__.py
│ ├── models
│ │ └── xgboost_test_model.xgb
├── .gitattributes
├── .github
│ ├── dependabot.yml
│ ├── ISSUE_TEMPLATE
│ │ ├── bug_report.md
│ │ ├── feature_request.md
│ │ └── general_question.md
│ ├── pull_request_template.md
│ └── workflows
│ ├── build_docs.yml
│ ├── build_package.yml
│ ├── pr_to_master_from_patch_release_only.yml
│ ├── publish_package.yml
│ ├── run_bandit.yml
│ ├── run_flake8_linting.yml
│ ├── run_mlf_core_lint.yml
│ └── sync.yml
├── .gitignore
├── LICENSE
├── Makefile
├── makefiles
│ ├── Linux.mk
│ └── Windows.mk
├── MANIFEST.in
├── mlf_core.cfg
├── .mlf_core.yml
├── README.rst
├── .readthedocs.yml
├── requirements_dev.txt
├── requirements.txt
├── setup.cfg
└── setup.py
Included frameworks/libraries
setuptools for code packaging
click for the command line interface
One of Pytorch, Tensorflow or XGBoost,
Preconfigured readthedocs
Six Github workflows:
build_docs.yml, which builds the readthedocs documentation.
build_package.yml, which builds the cli-python package.
run_flake8_linting.yml, which runs flake8 linting.
publish_package.yml, which publishes the package to PyPi. Note that it only runs on Github release and requires PyPi secrets to be set up.
run_bandit, run bandit to discover security issues in your python code
pr_to_master_from_patch_release_only: Please read pr_to_master_from_patch_release_only workflow.
Publishing the package to PyPI
Ensure that your package builds and passes any twine checks. The build_package.yml workflow verifies both.
If the workflow passes you should open a pull request to master and merge it after reviews.
The only thing left to do now is to create a release on Github.
Ensure that your PyPI secrets are set. Follow the instructions on Encrypted Secrets if required.
Github Support
Overview
mlf-core uses GitPython and PyGithub to automatically create a repository, add, commit and push all files.
Moreover, issue labels, a development and a TEMPLATE branch are created. The TEMPLATE branch is required for Syncing your project to work and should not be touched manually.
Branches
Overview
git branches can be understood as diverging copies of the main line of development and facilitate parallel development.
To learn more about branches read Branches in a Nutshell of the Pro Git Book.
A simple best practice development workflow follows the pattern that the master branch always contains the latest released code.
It should only be touched for new releases. Code on the master branch must compile and be as bug free as possible.
Development takes place on the development branch. All parallelly developed features eventually make it into this branch.
The development branch should always compile, but it may contain incomplete features or known bugs.
mlf-core creates a TEMPLATE branch, which is required for Syncing your project to work and should not be touched manually.
Branch protection rules
mlf-core sets several branch protection rules, which enforce a minimum standard of best branch practices.
For more information please read about protected branches.
The following branch protection rules only apply to the master branch:
Required review for pull requests: A pull request to
mastercan only be merged if the code was at least reviewed by one person. If you are developing alone you can merge with your administrator powers.Dismiss stale pull request approvals when new commits are pushed.
Github Actions
Overview
Modern development tries to merge new features and bug fixes as soon as possible into the development branch, since big, diverging branches are more likely to lead to merge conflicts.
This practice is known as continuous integration (CI).
Continuous integration is usually complemented with automated tests and continuous delivery (CD).
All of mlf-core’s templates feature Github Actions as primary CI/CD service.
Please read the Github Actions Overview for more information.
On specific conditions (usually push events), the Github Actions workflows are triggered and executed.
The developers should ensure that all workflows always pass before merging, since they ensure that the package still builds and all tests are executed successfully.
pr_to_master_from_patch_release_only workflow
All templates feature a workflow called pr_to_master_from_patch_release_only.yml.
This workflow runs everytime a PR to your projects master branch is created. It fails, if the PR to the master branch
origins from a branch that does not contain patch or release in its branch name.
If development code is written on a branch called development``and a new release of the project is to be made,
one should create a ``release branch only for this purpose and then merge it into master branch.
This ensures that new developments can already be merged into development, while the release is finally prepared and reviewed.
The patch branch should be used for required hotfixes (checked out directly from master branch) because, in the meantime, there might be
multiple developments going on at development branch and one should not interfere with them.
sync.yml
All templates also feature this workflow. This workflow is used for automatic syncing (if enabled) your project with the latest mlf-core template version.
The workflow invokes mlf-core sync, which automatically checks whether a new template version is available and if so it submits a pull request with the latest changes.
For more details please visit Syncing your project.
publish_docker.yml
All templates featuring Docker containers feature this workflow.
Any time you push to the development branch or create a release, a Docker container is built and released to Github Packages.
You should ensure that all of your pushes to the development branch are *-SNAPSHOT versions and only when releasing a non-SNAPSHOT version is built.
The workflow uses your Github PAT to write and overwrite (=delete) packages. You need to ensure that you provide your PAT with sufficient rights.
mlf-core requires full repo (not repo delete!), write:packages and delete:packages rights and workflow permissions!.
If you want to push to a different registry, then you need to adapt the workflow manually.
Replace
registry: docker.pkg.github.comwith your registry of choice.Replace the username and password accordingly. It is strongly recommended to replace the password with a secret.
Secrets
Github secrets are what their name suggests: Encrypted secret values in a repository or an organisation; once they are set their value can be used for sensible data in a project or an organisation but their raw value can never be seen again even by an administrator (but it can be updated).
mlf-core uses a secret called MLF_CORE_SYNC_TOKEN for its syncing feature. This secret is automatically created during the repository creation process, if you choose to create a GitHub repo.
The secret contains your encrypted personal access token as its value. Note that this will have no effect on how to login or any other activity in your project.
If you remove the secret or change its value (even with another personal access token of you) the syncing feature will no longer work.
In case you are creating an organisation repository, the secret will also be stored as a repository secret, only usable for your specific project.
Error handling during Github repository creation
Errors during the create process due to a failed Github repo creation may occur due to a vast amount of reasons: Some common error sources are:
You have no active internet connection or your firewall protects you against making calls to external APIs.
2. The Github API service or Github itself is unreachable at the moment, which can happen from time to time. In doubt, make sure to check the Github status page.
A repository with the same name already exists in your account/your organisation.
The token does not have all repository and workflow permissions.
Creation fails, ok: But how can I then access the full features of mlf-core?
Try to fix the issue (or wait some time on case, for example, when Github is down) and then process to create a Github repository manually.
After this, make sure to create a secret named MLF_CORE_SYNC_TOKEN with the value of your PAT for your repository.
See the Github docs
for more information on how to create a secret.
Creating Releases
This document serves as a guideline on how to create releases of your project. Additionally, it may provide pointers about best practices and development workflows.
x.x.x-SNAPSHOT version, you should ensure that your changelog is complete.$ mlf-core bump-version x.x.x .
release/x.x.x branch and submit a pull request from it against the master branch.master branch. Afterwards create a release on Github with the tag x.x.x and insert your changelog into the description and add any additional details that you deem important. A new Docker container should now be building with the latest version.development branch and merge the latest master branch into it. Next, according to semantic versioning and your planned features bump the version to a higher -SNAPSHOT version. The changelog will automatically add sections.Contributing
Contributions are welcome and greatly appreciated! Every little bit helps and credit will always be given. If you have any questions or want to get in touch with the core team feel free to join our Discord server.
You can contribute in many ways:
Types of Contributions
Report Bugs
Report bugs at https://github.com/mlf-core/mlf-core/issues.
If you are reporting a bug, please:
Use the appropriate issue template.
Be as detailed as possible. The more time you invest into describing the bug, the more time we save solving them, effectively allowing us to improve mlf-core at a faster pace.
Be patient. We are passionate, hard workers, but also have demanding full time jobs, which require a lot of our attention.
Fix Bugs
Look through the GitHub issues for bugs. We would appreciate it if you quickly commented on the respective issue and write that you are working on this bug, to minimize the chances of two people working on the same task.
Implement Features
Look through the GitHub issues for features. The same rule also applies to features. Please write if you’re picking up one of the feature suggestions.
Add Templates
Write Documentation
mlf-core could always use more documentation, whether as part of the official mlf-core docs, in docstrings, or even on the web in blog posts, articles, and such.
Submit Feedback
The best way to send feedback is to file an issue here .
If you are proposing a feature:
Use the appropriate GitHub issue
Explain in detail how it would work.
Keep the scope as narrow as possible, to make it easier to implement.
Remember that this is a volunteer-driven project, and that contributions are welcome :)
Get Started!
Ready to contribute? Here’s how to set up mlf-core for local development.
Fork the mlf-core repo on GitHub.
Clone your fork locally
$ git clone git@github.com:your_name_here/mlf-core.git
Install your local copy into a virtualenv. Assuming you have virtualenvwrapper installed, this is how you set up your fork for local development
$ mkvirtualenv mlf_core
$ cd mlf_core/
$ pip install .
Create a branch for local development
$ git checkout -b name-of-your-bugfix-or-feature
Now you can make your changes locally.
When you’re done making changes, check that your changes pass flake8 and the tests, including testing other Python versions with tox
$ flake8
$ tox
To get flake8 and tox, just pip install them into your virtualenv.
Commit your changes and push your branch to GitHub
$ git add .
$ git commit -m "Your detailed description of your changes."
$ git push origin name-of-your-bugfix-or-feature
Submit a pull request through the GitHub website.
Pull Request Guidelines
Before you submit a pull request, check that it meets these guidelines:
The pull request should include tests.
- If the pull request adds functionality, the docs should be updated.Put your new functionality into a function with a docstring, and add the feature to the list in README.rst, if it is a major feature.
The pull request should work for Python 3.7+. Check your pull request on Github and verify that all checks and GitHub workflows are passing!
Adding new templates
Adding new templates is one of the major improvements and community contributions to mlf-core, which is why we are dedicating a whole section to it.
Please note that creating new templates is a time consuming task. So be prepared to invest a few hours to bring a new template to life.
The integration into mlf-core however, is straightforward if you follow the guide below.
Due to the tight coupling of our templates with all mlf-core commands such as create, list, info, lint and bump-version,
new templates require the modification of several files.
mlf-core uses cookiecutter to create all templates. You need to familiarize yourself beforehand with cookiecutter to able to write templates, but don’t worry, it’s pretty easy and you usually get by with very few cookiecutter (jinja2) variables. You can start with your very first cookiecutter template and then simply see how the other existing mlf-core templates are made and copy what you need.
The following sections will line out the requirements for new templates and guide you through the process of adding new templates step by step. Nevertheless, we strongly encourage you to discuss your proposed template first with us in public via a Github issue.
Template requirements
To keep the standard of our templates high we enforce several standards, to which all templates must adhere. Exceptions, where applicable, but they would have to be discussed beforehand. Hence, the term should.
New templates must be novel. We do not want a second mlflow-pytorch template, but you are of course always invited to improve it.
All templates should be cutting edge and not be based on technical debt or obscure requirements. Our target audience are enthusiastic open source contributors and not decades old companies stuck with Python 2.7.
All machine learning templates must be fully GPU deterministic and integrate system-intelligence.
All templates should provide A docker and Conda environment where applicable (especially all mlflow templates).
All templates must provide a readthedocs setup, a README.rst, usage.rst and installation.rst file, a LICENSE, Github issue and pull request templates and a .gitignore file. Moreover, a .dependabot configuration should be present if applicable. Note that most of these are already included in our common_files and do not need to be rewritten. More on that below.
All templates must implement all required functionality to allow the application of all commands mentioned above to them, which includes a mlf_core.cfg file, the template being in the available_templates.yml and more.
All templates must have Github workflows, which at least build the documentation and the project.
Every template must also have a workflow inside mlf-core, which creates a project from the template with dummy values.
Again, we strongly suggest that new templates are discussed with the core team first.
Step by step guide to adding new templates
Let’s assume that we are planning to add a new commandline Brainfuck template to mlf-core.
We discussed our design at length with the core team and they approved our plan. For the sake of this tutorial we assume that the path / always points to /mlf_core.
Hence, at this level we see cli.py and a folder per CLI command.
Let’s add our brainfuck template information to
/create/templates/available_templates.ymlbelow theclisection.
cli:
brainfuck:
name: Brainfuck Commandline Tool
handle: cli-brainfuck
version: 0.0.1
available libraries: none
short description: Brainfuck Commandline tool with ANSI coloring
long description: Amazing brainfuck tool, which can even show pretty unicorns in the console.
Due to ANSI coloring support they can even be pink! Please someone send help.
- Next, we add our brainfuck template to
/create/templatesNote that it should adhere to the standards mentioned above and include all required files. Don’t forget to add a mlf_core.cfg file to facilitate bump-version. See Configuration for details. It is mandatory to name the top level folder{{ cookiecutter.project_slug }}, which ensures that the project after creation will have a proper name. Furthermore, thecookiecutter.jsonfile should have at least the following variables:
{
"full_name": "Homer Simpson",
"email": "homer.simpson@posteo.net",
"project_name": "sample-cli",
"project_slug": "sample-cli",
"version": "1.0.0",
"project_short_description": "Command-line utility to...",
"github_username": "homer_github"
}
The file tree of the template should resemble
├── cookiecutter.json
└── {{ cookiecutter.project_slug }}
├── docs
│ ├── installation.rst
│ └── usage.rst
├── .github
│ └── workflows
│ └── build_brainfuck.yml
├── hello.bf
├── mlf_core.cfg
└── README.rst
- Now it is time to subclass the
TemplateCreatorto implement all required functions to create our template!Let’s edit/create/domains/cli_creator.py. Note that for new domains you would simply create a new file called DomainCreator.In this case we suggest to simply copy the code of an existing Creator and adapt it to the new domain. Your new domain may make use of other creation functions instead ofcreate_template_without_subdomain, if they for example contain subdomains. You can examinecreate/TemplatorCreator.pyto see what’s available. You may also remove functions such as the creation of common files.If we have any brainfuck specific cookiecutter variables that we need to populate, we may add them to the TemplateStructCli.Our brainfuck templates does not have them, so we just leave it as is.For the next step we simply go through theCliCreatorclass and add our brainfuck template where required. Moreover, we implement acli_brainfuck_optionsfunction, which we use to prompt for template specific cookiecutter variables.
@dataclass
class TemplateStructCli(MlfcoreTemplateStruct):
"""
Intended Use: This class holds all attributes specific for CLI projects
"""
"""____BRAINFUCK___"""
class CliCreator(TemplateCreator):
def __init__(self):
self.cli_struct = TemplateStructCli(domain='cli')
super().__init__(self.cli_struct)
self.WD = os.path.dirname(__file__)
self.WD_Path = Path(self.WD)
self.TEMPLATES_CLI_PATH = f'{self.WD_Path.parent}/templates/cli'
'"" TEMPLATE VERSIONS ""'
self.CLI_BRAINFUCK_TEMPLATE_VERSION = super().load_version('cli-brainfuck')
def create_template(self, dot_mlf_core: dict or None):
"""
Handles the CLI domain. Prompts the user for the language, general and domain specific options.
"""
self.cli_struct.language = mlf_core_questionary_or_dot_mlf_core(function='select',
question='Choose the project\'s primary language',
choices=['brainfuck'],
default='python',
dot_mlf_core=dot_mlf_core,
to_get_property='language')
# prompt the user to fetch general template configurations
super().prompt_general_template_configuration(dot_mlf_core)
# switch case statement to prompt the user to fetch template specific configurations
switcher = {
'brainfuck': self.cli_brainfuck_options
}
switcher.get(self.cli_struct.language)(dot_mlf_core)
self.cli_struct.is_github_repo, \
self.cli_struct.is_repo_private, \
self.cli_struct.is_github_orga, \
self.cli_struct.github_orga \
= prompt_github_repo(dot_mlf_core)
if self.cli_struct.is_github_orga:
self.cli_struct.github_username = self.cli_struct.github_orga
# create the chosen and configured template
super().create_template_without_subdomain(f'{self.TEMPLATES_CLI_PATH}')
# switch case statement to fetch the template version
switcher_version = {
'brainfuck': self.CLI_BRAINFUCK_TEMPLATE_VERSION
}
self.cli_struct.template_version, self.cli_struct.template_handle = switcher_version.get(
self.cli_struct.language.lower()), f'cli-{self.cli_struct.language.lower()}'
super().process_common_operations(domain='cli', language=self.cli_struct.language, dot_mlf_core=dot_mlf_core)
[...]
def cli_brainfuck_options(self):
""" Prompts for cli-brainfuck specific options and saves them into the MlfcoreTemplateStruct """
pass
- If a new template were added we would also have to import our new Creator in
create/create.pyand add the new domain to the domain prompt and the switcher.However, in this case we can simply skip this step, sincecliis already included.
def choose_domain(domain: str):
"""
Prompts the user for the template domain.
Creates the .mlf_core file.
Prompts the user whether or not to create a Github repository
:param domain: Template domain
"""
if not domain:
domain = click.prompt('Choose between the following domains',
type=click.Choice(['cli']))
switcher = {
'cli': CliCreator,
}
creator_obj = switcher.get(domain.lower())()
creator_obj.create_template()
- Linting is up next! We need to ensure that our brainfuck template always adheres to the highest standards! Let’s edit
lint/domains/cli.py.We need to add a new class, which inherits from TemplateLinter and add our linting functions to it.
class CliBrainfuckLint(TemplateLinter, metaclass=GetLintingFunctionsMeta):
def __init__(self, path):
super().__init__(path)
def lint(self):
super().lint_project(self, self.methods)
def brainfuck_files_exist(self) -> None:
"""
Checks a given pipeline directory for required files.
Iterates through the templates's directory content and checkmarks files for presence.
Files that **must** be present::
'hello.bf',
Files that *should* be present::
'.github/workflows/build_brainfuck.yml',
Files that *must not* be present::
none
Files that *should not* be present::
none
"""
# NB: Should all be files, not directories
# List of lists. Passes if any of the files in the sublist are found.
files_fail = [
['hello.bf'],
]
files_warn = [
[os.path.join('.github', 'workflows', 'build_brainfuck.yml')],
]
# List of strings. Fails / warns if any of the strings exist.
files_fail_ifexists = [
]
files_warn_ifexists = [
]
files_exist_linting(self, files_fail, files_fail_ifexists, files_warn, files_warn_ifexists)
We need to ensure that our new linting function is found when linting is applied. Therefore, we turn our eyes to lint/lint.py, import our CliBrainfuckLinter and add it to the switcher.
from mlf_core.lint.domains.cli import CliBrainfuckLint
switcher = {
'cli-brainfuck': CliBrainfuckLint,
}
Our shiny new CliBrainfuckLinter is now ready for action!
- The only thing left to do now is to add a new Github Actions workflow for our template. Let’s go one level up in the folder tree and create
.github/workflows/create_cli_brainfuck.yml.We want to ensure that if we change something in our template, that it still builds!
name: Create cli-brainfuck Template
on: [push]
jobs:
build:
runs-on: ubuntu-latest
strategy:
matrix:
python: [3.8, 3.9]
steps:
- uses: actions/checkout@v2
name: Check out source-code repository
- name: Setup Python
uses: actions/setup-python@v2
with:
python-version: ${{ matrix.python }}
- name: Install Poetry
run: |
pip install poetry
poetry --version
- name: Build mlf-core
run: make install
- name: Create cli-brainfuck Template
run: |
echo -e "\n\n\n\n\nn\n\n\n\nn" | poetry run mlf-core create
- name: Build Package
uses: fabasoad/setup-brainfuck-action@master
with:
version: 0.1.dev1
- name: Hello World
run: brainfucky --file Exploding_Springfield/hello.bf
We were pleasently surprised to see that someone already made a Github Action for brainfuck.
- Finally, we add some documentation to
/docs/available_templates.rstand explain the purpose, design and frameworks/libraries.That’s it! We should now be able to try out your new template using
mlf-core createThe template should be creatable, it should automatically lint after the creation and Github support should be enabled as well! If we runmlf-core listOur new template should show up as well! I’m sure that you noticed that there’s not actually a brainfuck template in mlf-core (yet!).To quote our mighty Math professors: ‘We’ll leave this as an exercise to the reader.’
FAQ
mlf-core is compound software and due to its complex nature many questions may arise. This section serves as a collection of frequently asked questions. If you do not find your answer here you may always join our Discord channel and ask for help. We are happy to include your question here afterwards.
I need help with mlf-core. How can I get in contact with the developers?
You can open an issue or join our Discord channel.
I am looking for a template for domain x and language/framework y, but it does not exist yet!
We are always looking to add new templates to mlf-core. Please open an issue or join our Discord channel. Even better if you already have a draft for the template and/or could add it yourself!
How can you claim that your templates are GPU deterministic?
We performed extensive tests on various GPU architectures and can confidently say that given our settings GPU deterministic results can be expected on the same GPU architecture. Hence, all mlf-core templates feature system-intelligence, which queries your system for the used GPUs and their architecture.
What to do if my sync secret could not be set during project creation process?
You may encounter (rarely) the console info, that your projects sync secret could not be set during project creation. This is mostly caused by
GitHubs API not being reachable for a few seconds. You can now either recreate your project or simply head to your projects repo and set a repo secret called CT_SYNC_TOKEN with its
value being a valid personal access token for your account.
Reference
Top-level package for mlf-core.
Credits
Development Lead
Lukas Heumos <lukas.heumos@posteo.net>
Philipp Ehmele <philipp_ehm@protonmail.com>
Contributors
Edmund Miller <edmund.miller@utdallas.edu>
Contributor Covenant Code of Conduct
Our Pledge
In the interest of fostering an open and welcoming environment, we as contributors and maintainers pledge to making participation in our project and our community a harassment-free experience for everyone, regardless of age, body size, disability, ethnicity, gender identity and expression, level of experience, nationality, personal appearance, race, religion, or sexual identity and orientation.
Our Standards
Examples of behavior that contributes to creating a positive environment include:
Using welcoming and inclusive language
Being respectful of differing viewpoints and experiences
Gracefully accepting constructive criticism
Focusing on what is best for the community
Showing empathy towards other community members
Examples of unacceptable behavior by participants include:
The use of sexualized language or imagery and unwelcome sexual attention or advances
Trolling, insulting/derogatory comments, and personal or political attacks
Public or private harassment
Publishing others’ private information, such as a physical or electronic address, without explicit permission
Other conduct which could reasonably be considered inappropriate in a professional setting
Our Responsibilities
Project maintainers are responsible for clarifying the standards of acceptable behavior and are expected to take appropriate and fair corrective action in response to any instances of unacceptable behavior.
Project maintainers have the right and responsibility to remove, edit, or reject comments, commits, code, wiki edits, issues, and other contributions that are not aligned to this Code of Conduct, or to ban temporarily or permanently any contributor for other behaviors that they deem inappropriate, threatening, offensive, or harmful.
Scope
This Code of Conduct applies both within project spaces and in public spaces when an individual is representing the project or its community. Examples of representing a project or community include using an official project e-mail address, posting via an official social media account, or acting as an appointed representative at an online or offline event. Representation of a project may be further defined and clarified by project maintainers.
Enforcement
Instances of abusive, harassing, or otherwise unacceptable behavior may be reported by opening an issue. The project team will review and investigate all complaints, and will respond in a way that it deems appropriate to the circumstances. The project team is obligated to maintain confidentiality with regard to the reporter of an incident. Further details of specific enforcement policies may be posted separately.
Project maintainers who do not follow or enforce the Code of Conduct in good faith may face temporary or permanent repercussions as determined by other members of the project’s leadership.
Attribution
This Code of Conduct is adapted from the Contributor Covenant, version 1.4, available at https://www.contributor-covenant.org/version/1/4/code-of-conduct.html